You are using an out of date browser. It may not display this or other websites correctly.
You should upgrade or use an alternative browser.
You should upgrade or use an alternative browser.
How do you Colour your IR photos?
- Thread starter limwhow
- Start date
teerex
New Member
Wow lau!!!! Such detail explanation ... I certain learn alot from this...!!! Conduct courses I don't even mind to pay... Even better than those paid course... ")
Such unselfishness ... U really put mi to shame... Really proud to have u as my Brother!!! :thumbsup:
Agree whole heartedly with Ah Chua. :thumbsup:
Lim - your masking is very accurate. How/What do you mask with?
Thks.
Lx3ChuA
Senior Member
gonna try all the workflow here this wkend!
super big thank you to all bros here (limwhow, lxchua & wurdelak) who unselfishly share their workflow.:thumbsup::thumbsup:
xiaodi me only do basic channel swap + hue/saturation adjustment, no masking at all! :embrass:
No need to thanks mi... I just click click click in the nik where else bro Lim going thru the old fashion way... He is REALLY VERY GOOD!!!! :thumbsup:
Lx3ChuA
Senior Member
Agree whole heartedly with Ah Chua. :thumbsup:
Lim - your masking is very accurate. How/What do you mask with?
Thks.
Yup bro teerex, about to ask him also... the shape of the leaves and grass are killing mi...:bsmilie:
SurrealDreamWalker
Senior Member
i not much workflow to share, becoz my workflow are simple as bascially i followed the instructions as stated in the stickies before this.
Bro limwhow is the man :thumbsup: He's the Wizard of Colour-IR!!!
Somehow i have this feeling that bro limwhow was a graphic designer and now he is a creative/art director... becoz he has a very good knowledge of photoshop, and his PS skills are considered advanced!!! Bro limwhow has the eyes for designs too as evident in his use of typography, and comical photo-illustrations.. Bro limwhow, if i may ask... were you a graduate from the school of Arts/Design in LaSalle?
")
allenleonhart
Senior Member
i'm kinda surprised at how accurate the masking is actually...
limwhow
Senior Member
Agree whole heartedly with Ah Chua. :thumbsup:
Lim - your masking is very accurate. How/What do you mask with?
Thks.
Yup bro teerex, about to ask him also... the shape of the leaves and grass are killing mi...:bsmilie:
i'm kinda surprised at how accurate the masking is actually...
Gentlemen, yes... I really hate masking... despite the fact that I use it so much in my PP.
There is really no easy way out when it comes to masking.
We really have to suffer the grind of slowly bit by bit extracting it out...
But in order for me to find out from the more experienced shooters out there if there are any better ways,
please allow me to just share with the community what I usually do.
Please don't hesitate to point out if I have done anything wrongly.
Or even better, if anyone has a much easier and better way, please share with all of us.
Here goes...
limwhow
Senior Member
My Masking Workflow
I think, anyone who plays with Photoshop a lot will realise that masking is one of the most important parts of the art of Photoshoppery.
To extract the most out of Photoshop, one really has to patiently mask one's subject slowly.
Of course, PS has some built-in functions that make it easier:
For any masking purpose, I would jump to either one of these.
My personal journey in masking seems to tell me that:
This is an utter nightmare when it comes to masking, as I agree with Teerex, Lx3ChuA and allenleonhart.
I will go through some of my techniques.
But I must say first that I am still in pursue of the perfect way... and I haven't found it.
So anyone who has a better way, I will be most grateful if you can share with us.
I think, anyone who plays with Photoshop a lot will realise that masking is one of the most important parts of the art of Photoshoppery.
To extract the most out of Photoshop, one really has to patiently mask one's subject slowly.
Of course, PS has some built-in functions that make it easier:
- Quick Selection Tool
- Magic Wand Tool
- Lasso, Polygonal Lasso, Magnetic Lasso
- Or simply using the paint brush to paint over the desired area to create a mask
For any masking purpose, I would jump to either one of these.
My personal journey in masking seems to tell me that:
- For solid structures like wooden trunk, building walls, boats shapes... and any of these solid structures with uneven surface colours, the Quick Selection seems to work better.
- For a vast expansive area of very similar colours, I would not hesitate to use Magic Wand Tool.
This is an utter nightmare when it comes to masking, as I agree with Teerex, Lx3ChuA and allenleonhart.
I will go through some of my techniques.
But I must say first that I am still in pursue of the perfect way... and I haven't found it.
So anyone who has a better way, I will be most grateful if you can share with us.
limwhow
Senior Member
1. Quick Selection Tool and Magic Wand Tool
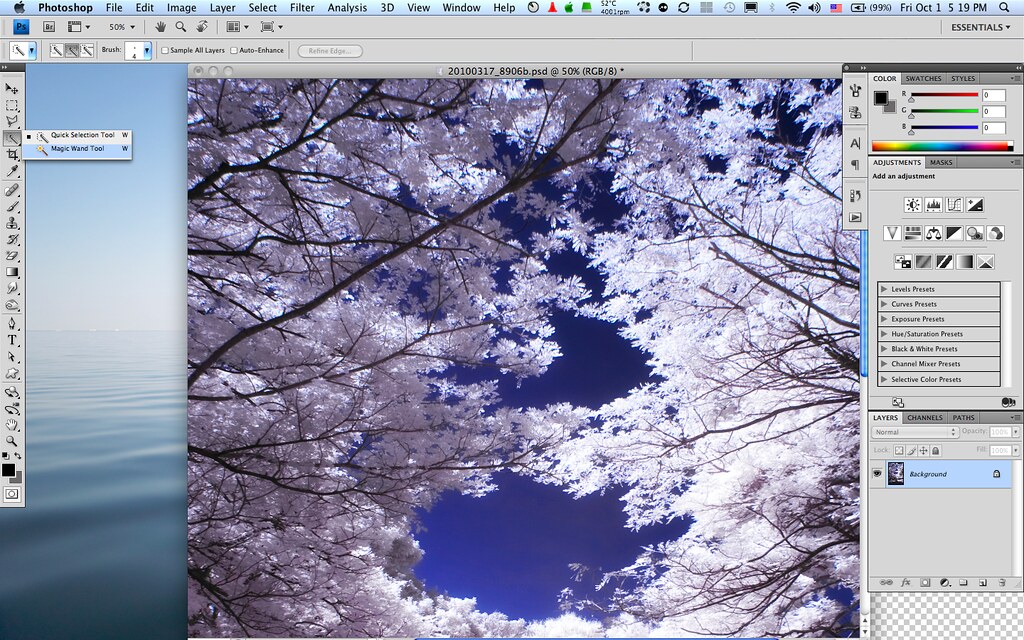
Many of our fellow CSers here would be very familiar with these two tools.
But again for the benefits of our new shooters, just let me quickly show these two functions.
Magic Wand and Quick Selection can be found here, as seen on the left side of the screen:
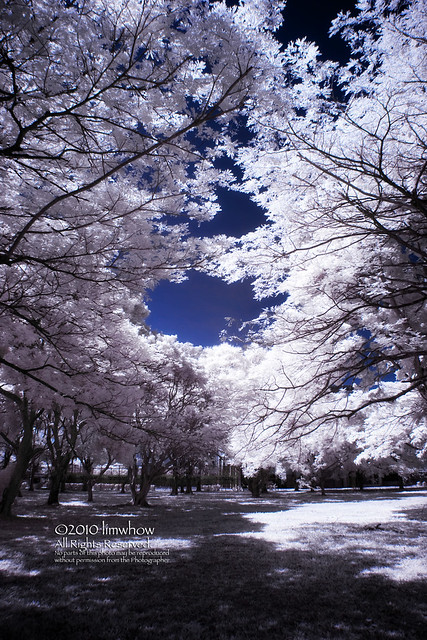
As illustrated below, I used Magic Wand Tool for one area and Quick Selection Tool for the other area.
Unfortunately, due to the very nature of these two Tools, there are still areas that have been missed (as shown).
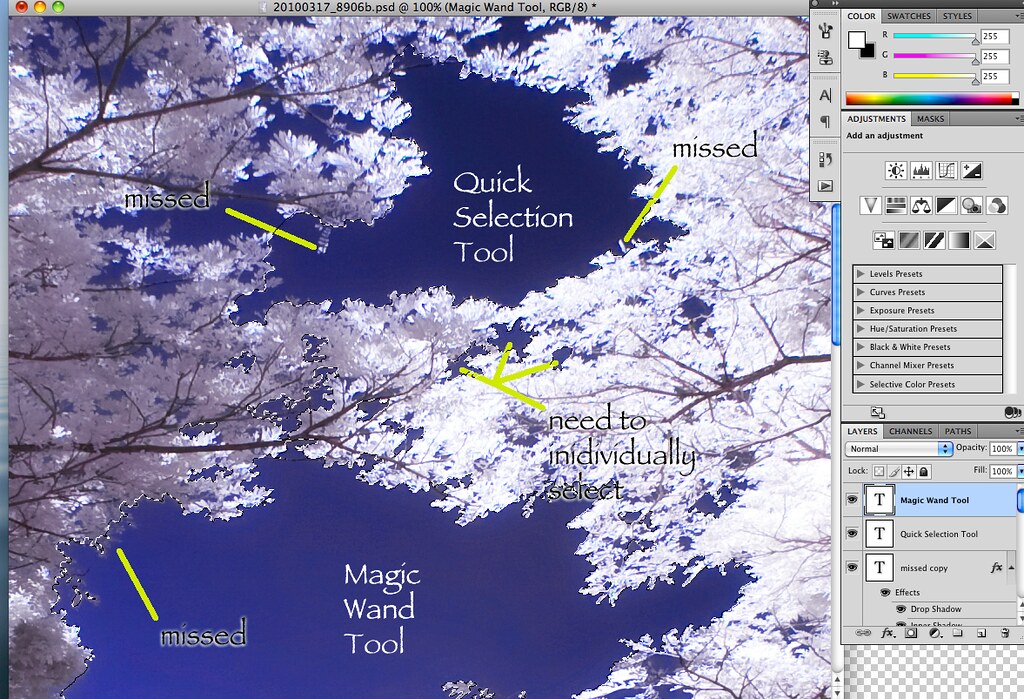
You may not be able to see the 'moving ants' selection clearly but they are there.
And as Teerex and Lx3ChuA has raised, it is really easy to miss tiny parts of the structures - particularly leaves and foliage.
Not only that, one has to repeatedly select those pockets of sky in between foliage.
This is in my opinion, one of the worse nightmares.
Thus I have learned to try to shoot my IR photos with as little skies in between the leaves as possible.... hahaha....
Many of our fellow CSers here would be very familiar with these two tools.
But again for the benefits of our new shooters, just let me quickly show these two functions.
Magic Wand and Quick Selection can be found here, as seen on the left side of the screen:
As illustrated below, I used Magic Wand Tool for one area and Quick Selection Tool for the other area.
Unfortunately, due to the very nature of these two Tools, there are still areas that have been missed (as shown).
You may not be able to see the 'moving ants' selection clearly but they are there.
And as Teerex and Lx3ChuA has raised, it is really easy to miss tiny parts of the structures - particularly leaves and foliage.
Not only that, one has to repeatedly select those pockets of sky in between foliage.
This is in my opinion, one of the worse nightmares.
Thus I have learned to try to shoot my IR photos with as little skies in between the leaves as possible.... hahaha....
limwhow
Senior Member
2. Other tools
Topaz Bundle/ Topaz Remask plug-in
This is where I stopped being a purist and resorted to the use of a plug-in called Topaz produced by Topazlabs.
The most useful tool in this bundle I find is the Remask tool.
Here, I simply open the Plug-in and do this:
And I don't have to be very accurate.
I simply aga-aga (guestimate) can already.
Because after the mask has been generated, I can still review it and do fine adjustments.
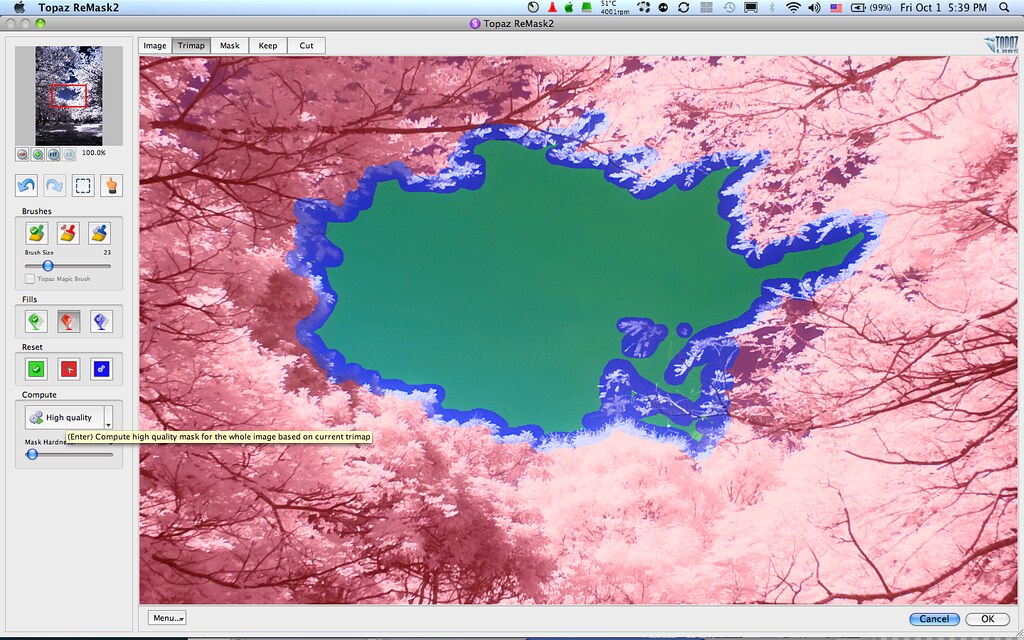
So after I have generated the mask with Topaz Remask, it looks like this:
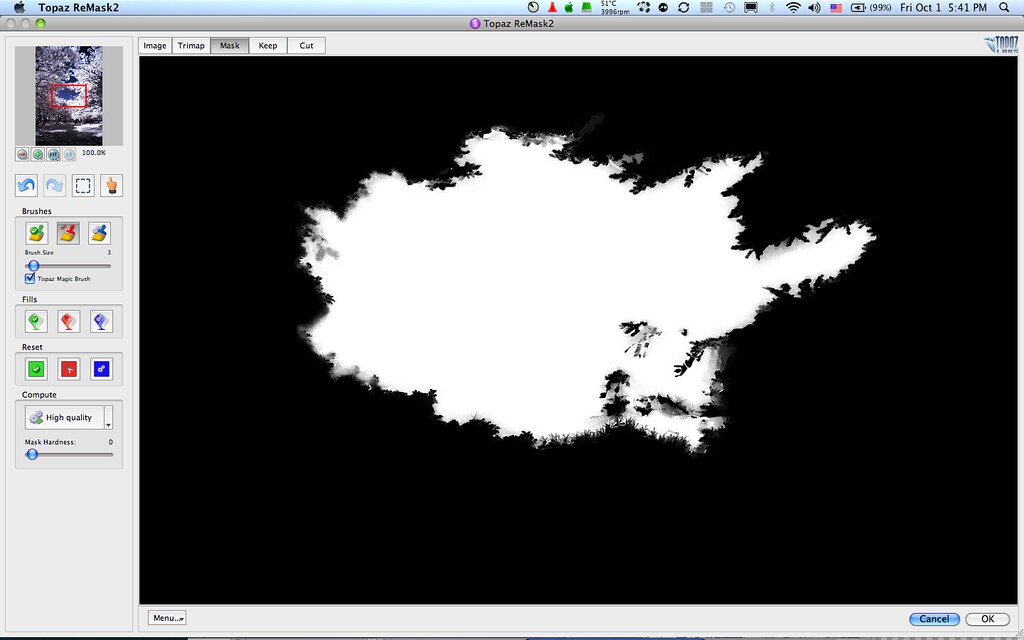
As many experienced maskers can see, it is really really not too bad already, in view of the very fine nature of the leaves and the faintness of the leaves colours.
In fact, if I may say - it is downright spectacular.
You can even see the tiny bits and pieces of the leaves jutting in and out of the periphery which Topaz has masked accurately.
And not only that, it creates the mask in graduation of tone from 100% opacity to lesser.
So the end result is, in my humble opinion, very accurate for me.
Of course in this case, I did a little bit of fine tuning to obtain this mask.
Not much , just a little.
And when I finally bring the mask over to the actual image, it looks like this:
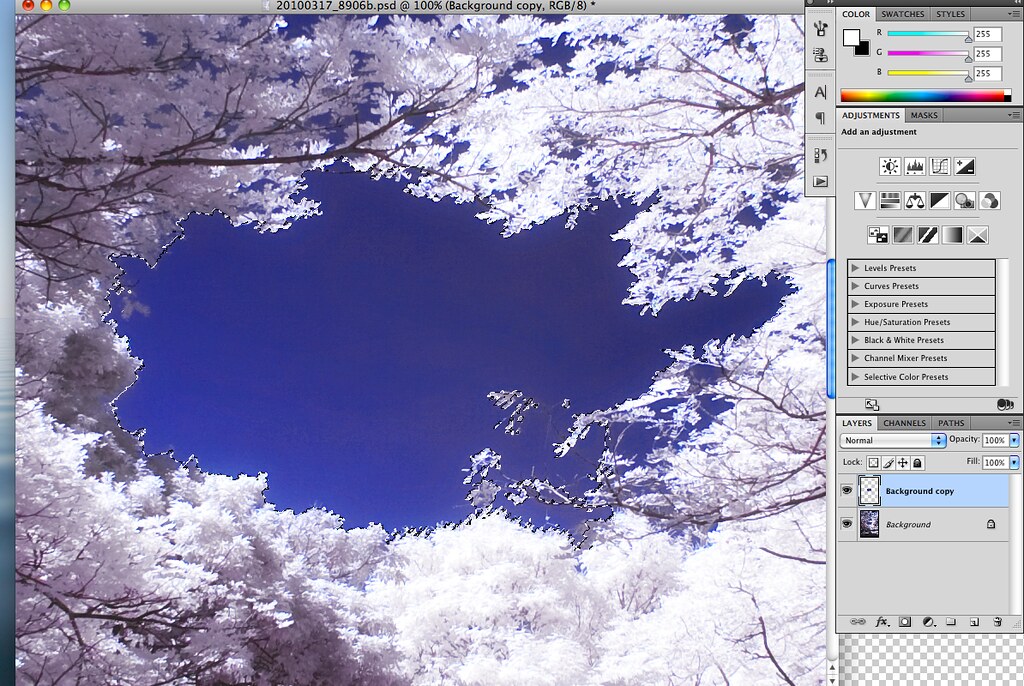
Again, in the above illustration, it is really hard to see clearing the 'moving-ants' selection.
But I think the best illustration would be the one with the Black and White mask two illustrations above.
We can see that the masking has been done to pretty acceptable precision.
Summary
Therefore, I think the take home message for our fellow new IR shooters is: there is no easy way out when it comes to masking.
It take time and loads of patience.
I still use a lot of Quick Selection Tool and Magic Wand Tool.
But I find myself using the Topaz Remask plug-in for more complex subjects.
From what I have heard from Lx3ChuA, in Photoshop CS5, there is a new masking function that is similar to this Topaz Remask.
But I have no experience in CS5 because at this point in time I am still using CS4.
Well, these are all my humble steps for masking that I managed to squeeze out.
There is nothing more that I know already.
So would be grateful to everyone for your feedback and inputs.
Topaz Bundle/ Topaz Remask plug-in
This is where I stopped being a purist and resorted to the use of a plug-in called Topaz produced by Topazlabs.
The most useful tool in this bundle I find is the Remask tool.
Here, I simply open the Plug-in and do this:
- The parts that I am not very sure and I want the computer to calculate for me - I paint in Blue.
- The parts that I don't want - I fill up with Red.
- The parts that I want - I fill up with Green.
And I don't have to be very accurate.
I simply aga-aga (guestimate) can already.
Because after the mask has been generated, I can still review it and do fine adjustments.
So after I have generated the mask with Topaz Remask, it looks like this:
As many experienced maskers can see, it is really really not too bad already, in view of the very fine nature of the leaves and the faintness of the leaves colours.
In fact, if I may say - it is downright spectacular.
You can even see the tiny bits and pieces of the leaves jutting in and out of the periphery which Topaz has masked accurately.
And not only that, it creates the mask in graduation of tone from 100% opacity to lesser.
So the end result is, in my humble opinion, very accurate for me.
Of course in this case, I did a little bit of fine tuning to obtain this mask.
Not much , just a little.
And when I finally bring the mask over to the actual image, it looks like this:
Again, in the above illustration, it is really hard to see clearing the 'moving-ants' selection.
But I think the best illustration would be the one with the Black and White mask two illustrations above.
We can see that the masking has been done to pretty acceptable precision.
Summary
Therefore, I think the take home message for our fellow new IR shooters is: there is no easy way out when it comes to masking.
It take time and loads of patience.
I still use a lot of Quick Selection Tool and Magic Wand Tool.
But I find myself using the Topaz Remask plug-in for more complex subjects.
From what I have heard from Lx3ChuA, in Photoshop CS5, there is a new masking function that is similar to this Topaz Remask.
But I have no experience in CS5 because at this point in time I am still using CS4.
Well, these are all my humble steps for masking that I managed to squeeze out.
There is nothing more that I know already.
So would be grateful to everyone for your feedback and inputs.
Last edited:
")
SereneXMM
New Member
Wow, very inspired, educational, meaningful IR PP tutorial!:thumbsup: :thumbsup:
May I've this honour to say "A BIG THANK YOU" to LxChua, Wurdelak, naynoy, night86mare and of course not forgetting my Limwhow. It's very good of you to contribute your workflow here, for people and myself to learn. Well done and please continue to do so...:cheergal::cheergal:
May I've this honour to say "A BIG THANK YOU" to LxChua, Wurdelak, naynoy, night86mare and of course not forgetting my Limwhow. It's very good of you to contribute your workflow here, for people and myself to learn. Well done and please continue to do so...:cheergal::cheergal:
Last edited:
limwhow
Senior Member
LowLights, it's good that you don't need to PP so much.Put you to Shame then me leh.. Got nothing to share..cause I don't PS so much :embrass:
It takes a highly confident photographer to present his photos with minimal PP. Thumbsup!
airforce1, hey you are too modest lah!All the technique way beyond my pp. My pp simple and I have nothing to share other then playing around with colors. Thank you guy will read it and try.
You have been shooting IR longer then some of us new boys around here.
Hey KT1031, nothing wrong with that - channel swap +Hue & Sat is indeed the basics of all IR PP.gonna try all the workflow here this wkend!
super big thank you to all bros here (limwhow, lxchua & wurdelak) who unselfishly share their workflow.:thumbsup:
xiaodi me only do basic channel swap + hue/saturation adjustment, no masking at all!
i not much workflow to share, becoz my workflow are simple as bascially i followed the instructions as stated in the stickies before this.
Bro limwhow is the man :thumbsup: He's the Wizard of Colour-IR!!!
Somehow i have this feeling that bro limwhow was a graphic designer and now he is a creative/art director... becoz he has a very good knowledge of photoshop, and his PS skills are considered advanced!!! Bro limwhow has the eyes for designs too as evident in his use of typography, and comical photo-illustrations.. Bro limwhow, if i may ask... were you a graduate from the school of Arts/Design in LaSalle?
Aiyoh, SurrealDreamWalker... thank you for your compliments.
Erm... no lah, aside from a little prior knowledge in PS, I am not trained in anyway. Haha...
nleong! You are a real joker.Wee How,
I haven't even started trying out the first workflow you posted and here you are with more
Stunning!!! don't wait liao, please start a course of IR PP - How To ? I first one to sign up. Don't mind paying also man... :thumbsup:
I joined ClubSNAP to learn. And to share what little I have gathered over the months.
As a pure hobbyist, this is where my passion is, as I am sure like many other shooters here.
Go ahead, try your own PP. And you will be surprised how your photos will turn out.
LuckyTiangco
New Member
These tutorial are very helpful.Like everybody else,I only knows basic channel swapping.Haven't really explore into IR photography.Thanks to those who share their photoshop expertise here.
Just got back from the jungle and is barely able to keep my eyes open until i saw this thread at CS....totally overwhelmed by the generosity of all my admired "giants"Limwhow, LxChua, Wurdelak, naynoy, night86mare and others for your sharing.... i am going to digest everything here bit by bit...Old man needs more time and brain juice to do that. I am a novice and not able to contribute; feel a bit awkward but if you feel like coming over here to unwind in future, i will make it up to you....hihihi Thank you, Kam siah, terima kasih, ..........
Edit: I not only got insights into how to improve the scope of IR post processing but also the high standard of the photographs presented directly influence the way i frame my photograph now.. Interesting composition and perspective...it is endless!!!!
Edit: I not only got insights into how to improve the scope of IR post processing but also the high standard of the photographs presented directly influence the way i frame my photograph now.. Interesting composition and perspective...it is endless!!!!
Last edited:
JellyBelly
Member
Call it paying forward!
This thread is a great service to the CS community! Kudos to Bro LimwHow who started this and everyone who has contributed to the knowledge sharing. It allowed new starters like myself to shorten the learning curve tremendously.
I hope this thread continue to flourish and inspire people to learn and share their PP techniques so that everyone can have the abilities to unleash their PP creativity!
I'm not great with writing (also being innately lazy) so I've attached a link to a video which I find useful as an alternate way to masking. This is not an efficient technique for complicated images like leaves but works fine for objects with low contrast smooth silhouettes that Magic Wands or Lassos may not work too well.
Masking and Changing Colour - THE CHIAK JUA WAY
http://www.groovypost.com/howto/adobe/how-to-adjust-change-color-photos-using-photoshop-cs5/
I've some success following the steps, turning this simple IR photo:

into these:


This thread is a great service to the CS community! Kudos to Bro LimwHow who started this and everyone who has contributed to the knowledge sharing. It allowed new starters like myself to shorten the learning curve tremendously.
I hope this thread continue to flourish and inspire people to learn and share their PP techniques so that everyone can have the abilities to unleash their PP creativity!
I'm not great with writing (also being innately lazy) so I've attached a link to a video which I find useful as an alternate way to masking. This is not an efficient technique for complicated images like leaves but works fine for objects with low contrast smooth silhouettes that Magic Wands or Lassos may not work too well.
Masking and Changing Colour - THE CHIAK JUA WAY
http://www.groovypost.com/howto/adobe/how-to-adjust-change-color-photos-using-photoshop-cs5/
I've some success following the steps, turning this simple IR photo:
into these:
Last edited:
limwhow
Senior Member
Call it paying forward!
This thread is a great service to the CS community! Kudos to Bro LimwHow who started this and everyone who has contributed to the knowledge sharing. It allowed new starters like myself to shorten the learning curve tremendously.
I hope this thread continue to flourish and inspire people to learn and share their PP techniques so that everyone can have the abilities to unleash their PP creativity!
I'm not great with writing (also being innately lazy) so I've attached a link to a video which I find useful as an alternate way to masking. This is not an efficient technique for complicated images like leaves but works fine for objects with low contrast smooth silhouettes that Magic Wands or Lassos may not work too well.
...
Hello JellyBelly,
Many thanks to you for coming forth and contributing your workflow.
The video you have shown is great as I learned something new from that.
What I learned was - I could actually use 'Fill' after a selection, and use 'Colour Burn' Blending mode to achieve the nice shiny results.
Great! I think everyone of us who is going to do changes in our photo's colour should give this video a visit.
Thank you once again, JellyBelly!
Similar threads
- Replies
- 0
- Views
- 206
- Replies
- 0
- Views
- 538
- Replies
- 0
- Views
- 251
- Replies
- 0
- Views
- 214