

1. Introduction
Cinemagraphs are created by photographer Jamie Beck and graphic artist Kevin Burg. It is animated GIFs (Graphics Interchange Format) made from masking out certain areas in a video sequence. This making of is a documentation of how I made this particular cinemagraph ‘The Shimmering’, given my equipment restrictions and shooting environment. We all know that there cannot be just one fixed way of doing things, so I hope this can be a reference for others to explore better working methods.
2. Tools
Hardware: Canon 550D, Sigma 30mm f1.4 lens, Manfrotto 682B self-standing monopod
Software: Photoshop CS4, After Effects 6.0
I strongly recommend against using Manfrotto 682B for shooting the videos. It is made for still photography. In windy condition it shakes. Use a steady tripod instead. Shaky video footage is unusable, or requires additional effort in post, like in my case here.
3. Shooting
As this is a group shoot meant for still photography, it is not the ideal shooting condition. I am lucky that one usable footage out of the five shot.
In an ideal situation, make sure that:
- You are using a steady tripod to minimize camera shake
- You have a plan, or at least an idea where is the moving area in the cinemagraph
- The model stay as still as possible (in my case, the only moving element is her hair)
- You take more short sequences of about 5 sec rather than a lengthy 3 min sequence. It makes life easier when u work on the computer later. It is also easier to go through shorter sequences.
However, in the 9 sec video I shot, I didn’t really ‘do the right thing’. The model is moving from pose to pose professionally for a still shoot, there is camera shake due to wind because I m not using a steady tripod. It is the perfect negative example.
Original video (downsized)
[video=youtube;cKVF9-Clkiw]http://www.youtube.com/watch?v=cKVF9-Clkiw&feature=youtu.be[/video]
4. Selection
Choosing a segment of the video with a reasonable number of frames for looping is the next hardest thing to do, other than making the loop itself. You will have to sit down and look through everything you shot and pick something suitable. I chose to work with a 9 sec video in the end.
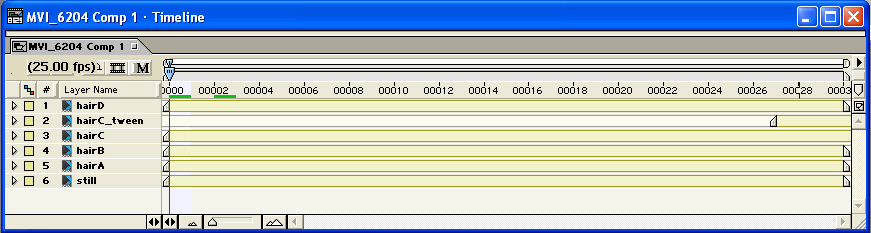
The actual length for this cinemagraph is merely 30 frames. The illusion of continuous motion lies in the first and the last frame matching up seamlessly. For this purpose, I bring the chosen 9 sec HD video into After Effects. I find it easier to do previews in After Effects than in Photoshop. It is meant for video after all.
In the ideal case, the simplest way is to mask out the hair from the rest of the image and make it loop. That is the first thing I tried. I tried making the last frame fades over a duration of 5 frames into the 1[SUP]st[/SUP] frame. That didn’t look good. I then tried doing a ‘ping-pong’ loop (i.e. playing from frame 1 to 30 and then from 30 back to 1 and so on so forth). That does not look natural too.
5. Making the Loop
Since the simple way did not work, I have to break the hair into 4 areas and make them loop well individually. There is no hard and fast rule for doing this. It is simply scrubbing the timeline up and down looking for something that works. There is also much trial and error. And because I did not shoot ‘the ideal way’, I have more pain in this process which could have been avoided.
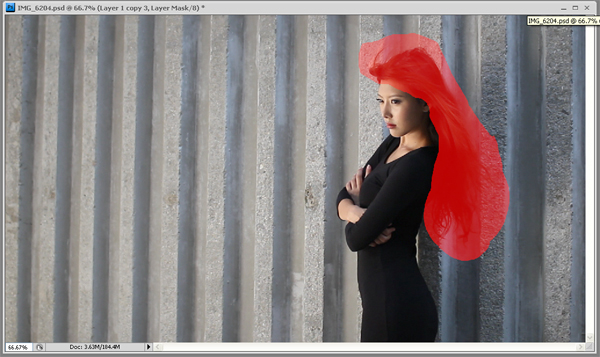
In the end, I break the hair into A, B, C & D (img5-1 & Img5-2) for the ease of explaining. They are duplicated from the same source video and masked out differently, blending into each other with soft masking.
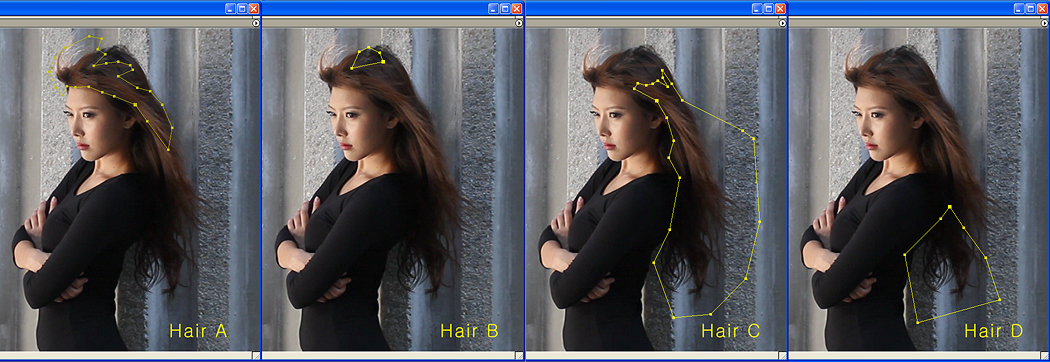
img5-1
img5-2
HairA is from frame 151 to 182. Due its fast movement, I need not do any work to make it loop. In this case, it is pure luck.
HairB is a duplicate of A. this is because there is head movement during that range and I need the area in HairB to remain static. So HairB is simply a still frame covering on top of HairA.
HairC is from frame 90 to 120. The movement for that part of the hair looks the best in that range. I duplicated HairC_Tween to fade into the first frame at the end of the sequence over 3 frames. By fading in like this, it will eliminate the sudden jump when it is looped.
HairD is from frame 190 to 219. I used Time-remapping to create a ‘ping-pong’ loop, such that it plays from frame 190 to 205 then back to 190.
As I have said earlier, if you have done the shooting ‘the right way’, you probably need not go through all these pains. One mask one layer may have done the job. Then again, when it comes to random flying hair, nothing is for sure.
Last edited:

")