My Tips @n Toy and Collectables Photography


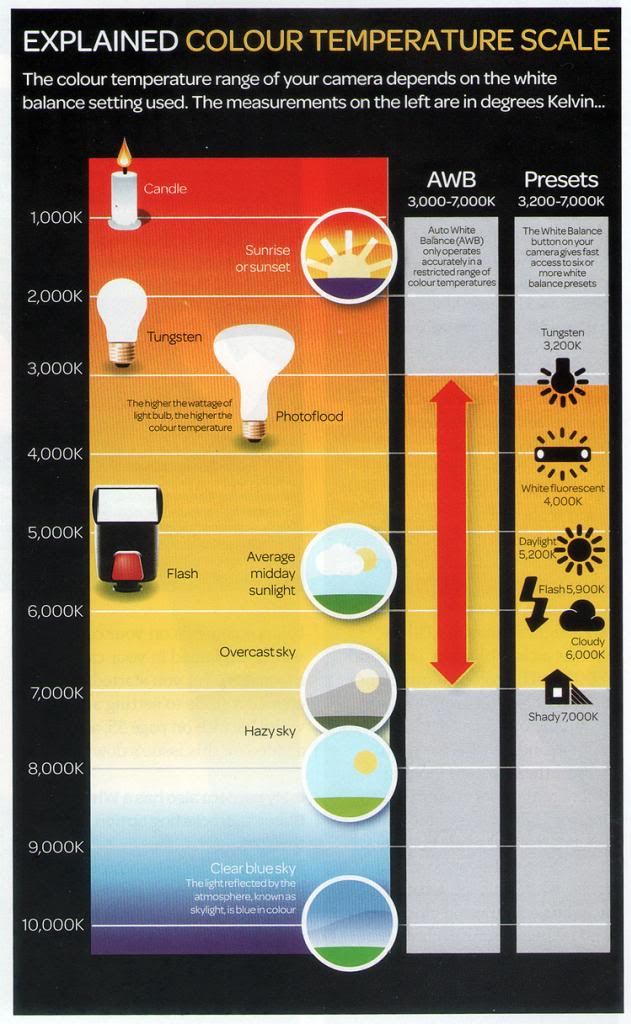
TIPS - Color Space Which to Use ? Adobe1988 or sRGB?

For people new to DSLR, you will see in Camera menu "Color Space" allowing you to choose sRGB or Adobe1988

These are nothing more than color range or format. As I shoot RAW I used Adobe1988 as this format offers MORE RANGE OF COLORS!

setup38.jpg


Of course for consistency in Post-Processing do make sure your Software like Photoshop or ViewNX is set to the CORRECT space also that is Adobe1988 so both "talk" same language i.e. the software reads your camera RAW file in the Adobe1988 color space/format - reproducing the colors what you had captured using this camera faithfully on the computer screen :bsmilie:
 

OK, you had chosen AdobeRGB - but do you know most LED or LCD monitor cannot display the FULL AdobeRGB range ?

setup40.jpg


If one is real serious on getting the ultimate color management flow from camera to display, AdobeRGB monitors are available - but at a higher price than mainstream monitors of course :sweat:

setup39.jpg


Most of us can't tell the difference anyway unless you have a AdobeRGB monitor to compare side by side.... :bsmilie:
 

TIPS - Calibrating Your Computer Monitor

If your monitor is un-calibrated, you run the risk in post-processing getting the "colors" which you see on your monitor as the "right" colors or exposure but in fact is wrong when view by others

setuptips41.jpg


To me, monitor calibration is a very important step - you want to get your image colors "spot-on" when viewed by others

When calibrating (things they don't tell you in user manual) :

1. Always set you graphics card to the max color bit available

2. Remeber to place the meter in the middle on the monitor (where you usually view images)

and then just following the software instructions to start the calibration

setuptips42.jpg


You will be asked to select

- MONITOR TYPE (LCD, Laptop, CRT)
- COLOR TEMPERATURE (i used 7000K) i.e. warm or true white etc.
- and do some manual adjustment on CONTRAST, R, G and B colors of the monitor

and then the software will do the rest. Once completed you will get this chart....

x-ritecal-1.jpg~original


You can then compare BEFORE and AFTER using this sample picture (by toggle CALIBRATION ON or OFF)

x-ritecal-2.jpg~original


ANNEX - added on 23 JUNE 2014


Since we are using 7000K , your monitor should display a WHITE background (like NOTEPAD) truly "WHITE". If it does not, some adjustment could be made manually on the MONITOR RGB i.e. if the "WHITE" is yellowish, try increasing B (Blue) and reducing R (Red) to get a true "WHITE" on the monitor, etc.

NOTE: Just don't over-do it


SetupTips56-1.jpg~original
 

Last edited:
TIPS - Using Reflectors

Sometimes due to lighting limitations or conditions, we may get TOO MUCH SHADOWS for a figure which is sometimes undesirable - for example like this toy below. The large hat blocks most of the lighting - making the eyes uninteresting (too dark). In ordet to get more HIGHLIGHTS in that area, I make use of a reflector

setup45.jpg


Using a silver reflector, I get more light to be reflected under the hat, to light up the figure eyes.

setup44.jpg


This is how the reflector is postioned as seen top-view ;)

setup43.jpg
 

TIPS - Get a SECOND Hygrometer !

My dry cabinet is a entry level one. One thing I found is the HYGROMETER that come with the unit is INACCURATE - the range is plus 10% to 15% off

To ensure an accurate humidity setting (of ~60%), I got myself a second and third HYGROMETER (just to try out).

There are many in the market and cheap ones from Ebay... but I got the Western Caliber ones both the analog and digital version. Both are really CALIBRATED hygrometers and dead accurate!

setup45-1.jpg


Remember - your camera and lens are worth very much more !
 

bro...
if this is assignment for Uni ... you would get AAA+ !!!
thanx for sharing ! i learn a lot from your thread !
:thumbsup::thumbsup::thumbsup:
 

Very well written, gj! :)
 

ahyen, Zichar and catchlights.. thanks :)
 

TIPS - Light Sources - Understanding the Fundamentals

Do you know that if your Light Source is BIGGER than the subject you produce soft shadows...

setuptips46.jpg


This fundamental can be seen in nature....

setuptips47.jpg
 

You will be wondering why above Sun and Clouds have to do with Photography.... well you see the FLASH is a nothing but a Single and Small Light Source... aka the "SUN" !

setuptips48.jpg


The solution - DIFFUSERS! aka the "CLOUDS" ;)

setuptips49.jpg


As you can see above, DIFFUSERS of various sizes are used in the industry just to make Light Source(s) BIGGER than the subject to produce soft shadows..... yes even one as large as a real car for car photo-shoot!

Similarly the diffusion dome, bounce card etc. are small and portable gadgets just to get "larger light source" from the small little flash speedlite ;)

setuptips50.jpg
 

Last edited:
TIPS - Shoot at Lens Optimum Apertures !

Every lens has a "Sweet Spot" i.e. optimum sharpness.

I used this site as a reference SLRgear.com as it has a library of 3D charts I can use to check a particular lens best aperture

setuptips53.jpg


Don't beleive ? Below are some sample close-up images using the NIKON 85mm 3.5DX - shot @ its "Sweet Spot" ;)

Board-1000.jpg


Board.jpg
 

Board-10CENTS-1000.jpg


Board-10CENTS.jpg
 

TIPS - White Balance in Product Photography - Get it Always Uniform

Every camera has a White Balance control to ensure any thing that are "white" will look "white" in the final image (see below on light colors).

As product photgraphy lighting used is always in a controlled environment, I always make sure my WHITE BALANCE is set to FLASH for uniformity and this saves time effort in Post Processing ;)

NOTE: WHITE BALANCE can be changed in Post-Procesisng if your images is captures in RAW format, not JPEG


LIGHT COLORS and WHITE BALANCE - EXPLAINED SIMPLE

Throughout the day, the Sun LIGHT COLORS varies from Sunrise (red or warm color), Afternoon or Daylight (cool daylight color), to Sun-set etc. Different Light Sources type also produce varying LIGHT COLORS like the light from a Candle Light is "red", Florescent Light is "blue", Tungsten lamp producing "yellow/orange" light, etc.


As such, there is a setting on every camera called "AUTO WHITE BALANCE" that automatically adjust to ensure any thing that are "white" will look "white" in the final image i.e. camera detect the scene and choose a appropriate/pre-defined WHITE BALANCE setting for that shot

Most of the time the camera "AUTO WHITE BALANCE" works perfectly
 

Last edited:
TIPS - Post-Processing Anime Figures

Unlike painted Metal Toy Soldiers or Stone Scupltures, anime figures are plastics and need additonal post-processing to "bring out" the flesh tone

Noticed for Toy Soldier, the unprocessed image is already "95% there" - just some sharpening and you will have your final image.

setup15.jpg


This is how the final image looks like after Post Processing in Photoshop (resize, sharpening and levels adjust - that's all)

setup18.jpg


For anime, you need to bring out the plastic flesh colors using the below Levels sliders

SetuoTips52-1.jpg


See the BEFORE and AFTER

SetuoTips53.jpg
 

TIPS - No Monitor Calibration Tool - Use this Manual Tuning Steps, It May Just Work !

Not planning to get a Monitor Color Calibration or Management tool like Xwrite or SYPDER ? Well this may just work - just follow the steps to tune your monitor ;)

LagomLCDTests.jpg


CHECK OUT THIS LINK LCD monitor test images
 

Last edited:
TIPS - Photoshop Layering - Combining Layers to Get the Final Picture

I used Photoshop Layering where below figures are shot indivdually then "combined" to give a diorama

Image I wish to show is American GI's lazing around after their tank hit a land mine damaging its track


Here's the concept

1. You start with the background

PhotoTips1.jpg


2. The you start adding the "layers" one by one

First remove the tank backgroud using this Photoshop tool

PhotoTips2.jpg


Do likewise for the figures

PhotoTips3.jpg
 

Last edited:
TIPS - Windows 7 Color Management Interfering with the Calibration Software After the Computer Recovers from Sleep or Hibernate Mode

(THIS DOES NOT AFFECT WINDOWS XP - only VISTA and 7.0 - not sure about Windows 8.0 which is a crap OS with no "Start" :angry:)


OK, you had calibrated your Windows 7 Computer TIPS - Calibrating Your Computer Monitor

But do you notice that the Color Calibration is all messed up when the Windows 7 Computer come out from SLEEP or HIBERNATE mode ?

Well you are not alone - follow this tip for the solution - it works ! http://www.laszlopusztai.net/2009/08/23/stop-losing-display-calibration-with-windows-7/