Modification Instructions for Nikon D40x
I had modified D70 and D70s in the past now I would like to modify the D40x.
Tools need to modify the Nikon D40x:
*A small Phillips screwdriver
* a pair of plastic tweezer
*An infrared filter cut to size 29.59mm x 25.27mm (do not need 100% accurate)
* A small plastic box to hold the screws
* A paper and pen to draw the position of the screws, take note that some screw is longer than the other
* A small soldering iron
* An air blower
Filter use: Edmund Long Pass filter.
Preparing for the modification:
* cut the filter to the correct size
* Clean your filter with alcohol, it must be completely clean of dust and there must be no scratches
* Clean your work table do not on the fan
* Clean your hands
* Remove the lens and replace it with the body cap, take out the SD card and battery
The modification
Step 1 At the bottom of the camera remove nine screws from the base, see the picture below. Draw the position of the screws on the paper and mark the longer screws position. There is a screw hidden under a rubber just beside the battery cover.
#1

Step 2 Carefully remove the base cover and place it on a safe place. Do not mix the bottom screws with the right and left side screws.
Step 3 Unscrew the two screws from right side of the camera as well as left side. Two more screws near the view finder need to dismantle. These screws had some glue on the thread therefore it is very hard to turn. A strong force is needed.
#2

Step 4 Remove the back cover with the LCD, there is a flexible PCB link to the body. Slowly flip up the black holding clip to release the flexible PCB.
#3

Step 5 At the back of the PCB, five flexible PCB need to remove and one wire need to de-solder (mark 1).
#4

Step 6 Dismantle the five screws holding the back PCB and place them on a box.
#5

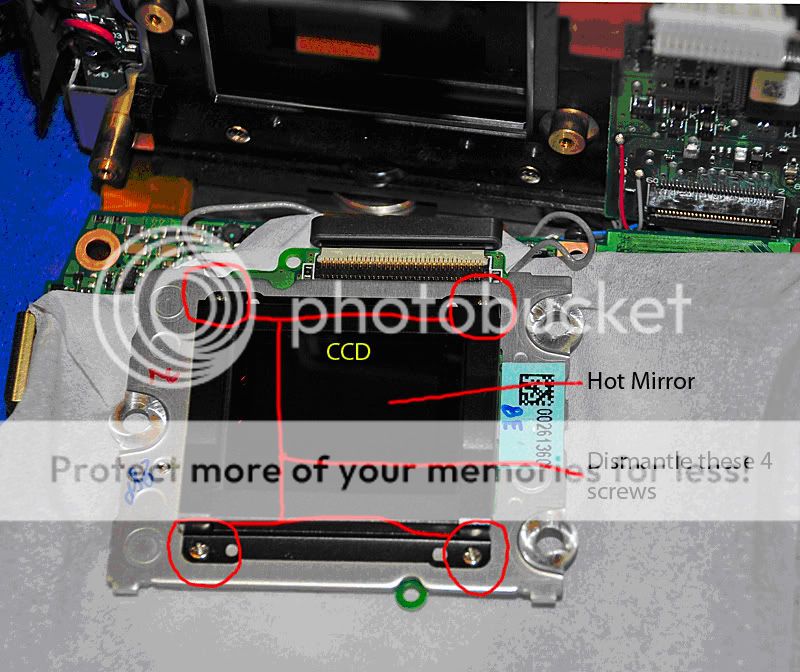
Step 7 Before dismantling the three screws holding the sensor board, use a marker to mark a line beside the screws. This is to ensure that the sensor will sit at the right position when the board is fixing back.
I had modified D70 and D70s in the past now I would like to modify the D40x.
Tools need to modify the Nikon D40x:
*A small Phillips screwdriver
* a pair of plastic tweezer
*An infrared filter cut to size 29.59mm x 25.27mm (do not need 100% accurate)
* A small plastic box to hold the screws
* A paper and pen to draw the position of the screws, take note that some screw is longer than the other
* A small soldering iron
* An air blower
Filter use: Edmund Long Pass filter.
Preparing for the modification:
* cut the filter to the correct size
* Clean your filter with alcohol, it must be completely clean of dust and there must be no scratches
* Clean your work table do not on the fan
* Clean your hands
* Remove the lens and replace it with the body cap, take out the SD card and battery
The modification
Step 1 At the bottom of the camera remove nine screws from the base, see the picture below. Draw the position of the screws on the paper and mark the longer screws position. There is a screw hidden under a rubber just beside the battery cover.
#1
Step 2 Carefully remove the base cover and place it on a safe place. Do not mix the bottom screws with the right and left side screws.
Step 3 Unscrew the two screws from right side of the camera as well as left side. Two more screws near the view finder need to dismantle. These screws had some glue on the thread therefore it is very hard to turn. A strong force is needed.
#2
Step 4 Remove the back cover with the LCD, there is a flexible PCB link to the body. Slowly flip up the black holding clip to release the flexible PCB.
#3
Step 5 At the back of the PCB, five flexible PCB need to remove and one wire need to de-solder (mark 1).
#4
Step 6 Dismantle the five screws holding the back PCB and place them on a box.
#5
Step 7 Before dismantling the three screws holding the sensor board, use a marker to mark a line beside the screws. This is to ensure that the sensor will sit at the right position when the board is fixing back.
Last edited: