RSSNewsFeeder
Member
On Monday, I showed how to use Lightroom to do online proofing, and I had a reader ask if there’s a way to watermark the images. It’s not part of the online proofing feature per se, but there is a workaround for Lightroom Classic so the images you post as proof will have your watermark. Here’s how in just three steps:

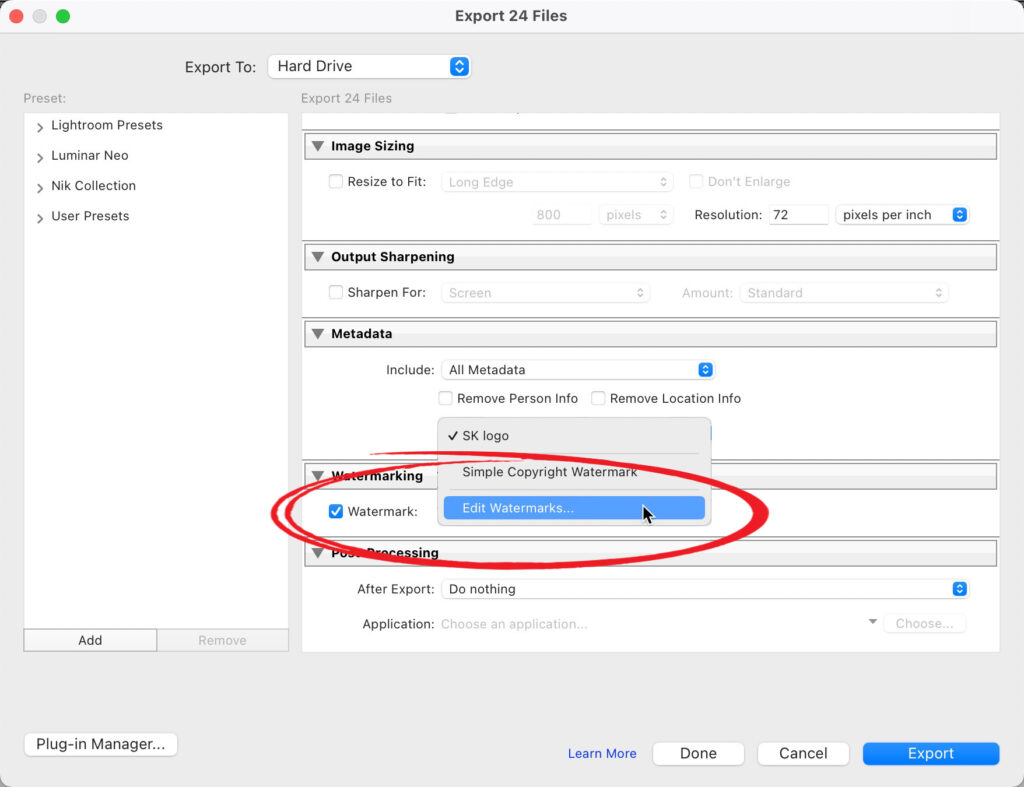
STEP ONE: Select the images you want to post as proofs, and then go under LIghtroom’s File Menu and choose Export. When the Export window appears, turn on the checkbox for “Watermark” and the choose your watermark (if you saved one already), or choose Edit Watermarks to add a custom one (using a graphic, like your logo), or a text watermark.

STEP TWO: If you choose ‘Edit Watermarks, ‘ you will see the Watermark Editor window above. In this case, I’m going to import my logo, so at the top left, I chose “Graphic” for Watermark Style. If you don’t want to import a graphic, then choose “Text” up there, and then format your text (font, size, and position) under the Watermark Effects selection, then click Save to have your watermark applied to all the images you selected for Export. Now hit the Export button to export your images to a folder on your computer.

Above: Here are the images saved to my computer with the Watermark in the center of each image.

STEP THREE: Now you’re going to re-import these images into Lightroom, and you can choose to import them directly into a new collection (click the + sign in the list of Collections on the right side), and when the Create Collection dialog appears, turn on the checkbox for “Sync with Lightroom.”
That’s it. Now you’re ready to follow Monday’s tutorial, and all the images you post for proofing now have your watermark. Yes, it’s a few more steps, but if it keeps your customers from screen capturing or downloading the images from your shoot without paying for them, this extra step might be totally worth it.
Have a great weekend, everybody.

-Scott
P.S. The iPhone Photography Conference is next week. Over 1,000 photographers will be learning some incredible iPhone photography techniques – don’t miss out on this Itwo-day, two-track event with some of the best iPhone instructors out there! Tickets and more details at kelbyonelive.com
The post How to Watermark Images For Online Proofing (follow-up to Monday’s post) appeared first on Lightroom Killer Tips.
Continue reading...

STEP ONE: Select the images you want to post as proofs, and then go under LIghtroom’s File Menu and choose Export. When the Export window appears, turn on the checkbox for “Watermark” and the choose your watermark (if you saved one already), or choose Edit Watermarks to add a custom one (using a graphic, like your logo), or a text watermark.

STEP TWO: If you choose ‘Edit Watermarks, ‘ you will see the Watermark Editor window above. In this case, I’m going to import my logo, so at the top left, I chose “Graphic” for Watermark Style. If you don’t want to import a graphic, then choose “Text” up there, and then format your text (font, size, and position) under the Watermark Effects selection, then click Save to have your watermark applied to all the images you selected for Export. Now hit the Export button to export your images to a folder on your computer.

Above: Here are the images saved to my computer with the Watermark in the center of each image.

STEP THREE: Now you’re going to re-import these images into Lightroom, and you can choose to import them directly into a new collection (click the + sign in the list of Collections on the right side), and when the Create Collection dialog appears, turn on the checkbox for “Sync with Lightroom.”
That’s it. Now you’re ready to follow Monday’s tutorial, and all the images you post for proofing now have your watermark. Yes, it’s a few more steps, but if it keeps your customers from screen capturing or downloading the images from your shoot without paying for them, this extra step might be totally worth it.
Have a great weekend, everybody.

-Scott
P.S. The iPhone Photography Conference is next week. Over 1,000 photographers will be learning some incredible iPhone photography techniques – don’t miss out on this Itwo-day, two-track event with some of the best iPhone instructors out there! Tickets and more details at kelbyonelive.com
The post How to Watermark Images For Online Proofing (follow-up to Monday’s post) appeared first on Lightroom Killer Tips.
Continue reading...
