RSSNewsFeeder
Member
Following up from last week … by having this big picture understanding of LrC along with solid catalog management skills you’re well positioned to leverage more of what it has to offer. I’ve mentioned the word import a few times, so let’s clarify exactly what that means and why it is important.
Importing photos into LrC is the process of bringing information about your photos from your memory card (or already on your computer) into the catalog for organization, editing, and management. The act of importing creates a database record for each photo you bring in, and that record is where all the work you ever do to each photo is stored. The import process can also include copying or moving photos to a new location, but that is a secondary function. To begin an import, open the Library module and click the Import button located at the bottom left corner of the screen.
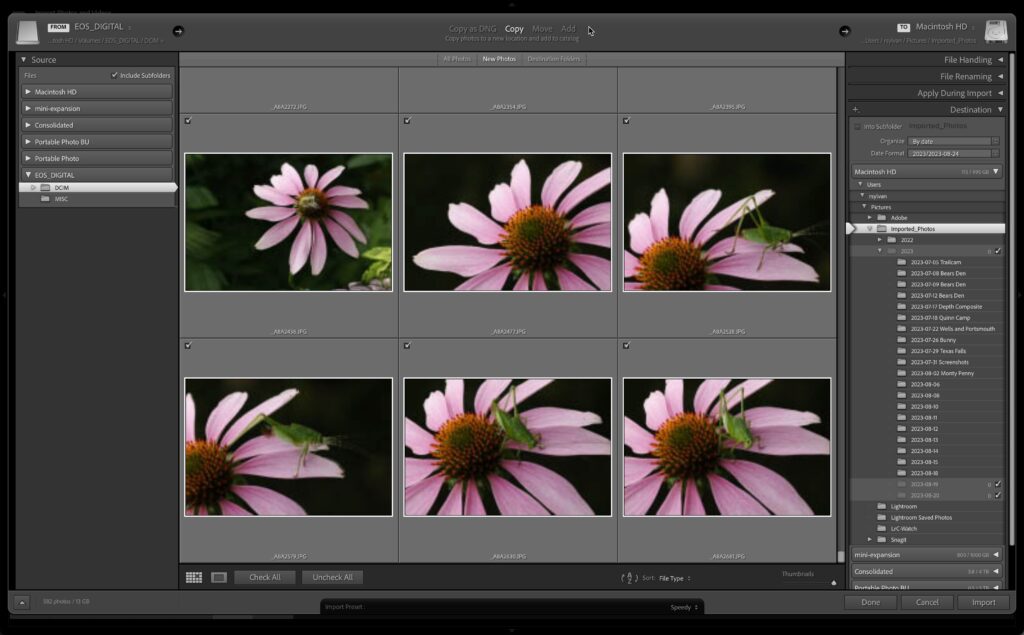
Here are the key things to know about the Import dialog:
Choose a Source: Choose the desired source from which you want to import, such as a memory card or a specific folder on your computer.
Copy, Move, or Add: Across the top of the Import dialog, you need to choose what action you want to perform on your photos. The most common option is to choose Copy, which copies the photos from the source to a new destination. If the photos are already in the location you want them to reside (such as a folder on your hard drive) you can choose Add and no copying or moving of photos will occur.
Destination Folder: If choosing the Copy or Move option you next need to choose where you want LrC to put the photos being imported. You can organize your photos by date, location, or other criteria. Choose a scheme that makes sense to your brain and can scale easily into the future. Note, after import you can use LrC to move photos between folders and manage your photos, but you need to pick this starting location. If Add was selected you won’t see the Destination panel as the photos are already in their destination.
I’m going to take this opportunity to point out that it is in your best interests to only use LrC to move photos and folders around on your drive to keep the catalog up to date with these changes. If you move imported photos outside of LrC you will break the link between the catalog and the photos and create more work for yourself.
All the other options on the Import dialog are there to help speed up other aspects of your workflow, such as applying metadata or edits, but they are not required. In the beginning, refine your thinking about your organizational structure for your photos as that is super important over time. As you become more proficient, utilize the other Import dialog panels to multi-task the import process and save those settings as an import preset.
After importing, the photos will appear in the Library. From there, you can further organize, edit, and manage your photos using the various tools and features as you move through your workflow. Presets, profiles, and default settings are important tools to making your workflow more efficient, so let’s talk about what those mean.
While LrC can handle JPGs, PNGs, TIFs, PSDs, and even many video formats it has its roots in editing raw files. If you choose to capture photos in raw format then that image data has not been fully processed by the camera, which allows for more flexible postproduction choices down the road (such as changing white balance). When a raw photo is imported into LrC it has to apply some form of default settings to serve as a starting place for you to view, evaluate, and begin editing the photo. Out of the box, LrC has an Adobe designed default, and while there is nothing inherently wrong with that, you can customize your default settings to your liking. Creating a custom default requires selecting a develop preset that applies desired settings in the Raw Defaults section of the Presets tab of the Preferences.

People are sometimes confused about presets and profiles, so let’s clarify. Presets and profiles are both tools that allow you to apply specific adjustments and looks to your photos. However, they serve slightly different purposes and work in distinct ways:
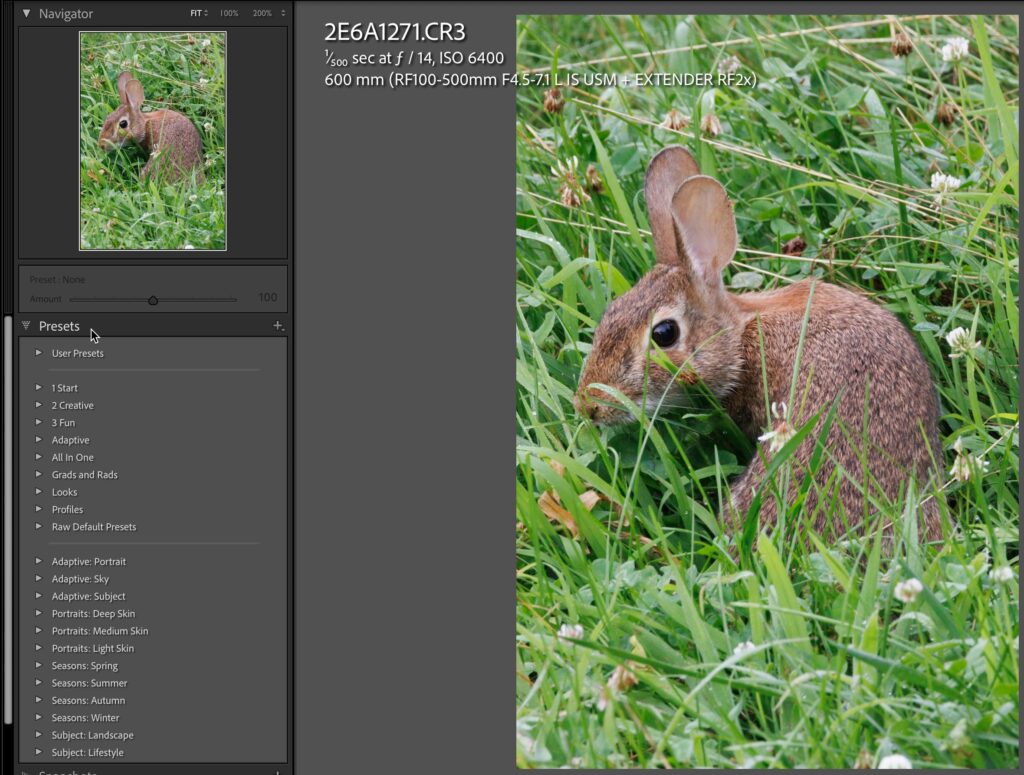
Presets are simply a way to save a combination of adjustments (or even a single adjustment) in a file that you can apply to your photos with a click. They are essentially a collection of settings that affect various aspects of an image, such as exposure, contrast, color grading, and more. Presets are often used to achieve a consistent look across a series of images or to quickly experiment with different styles. LrC comes with a lot of presets in the Presets panel of the Develop module, but over time you can create your own custom presets or acquire presets from others.
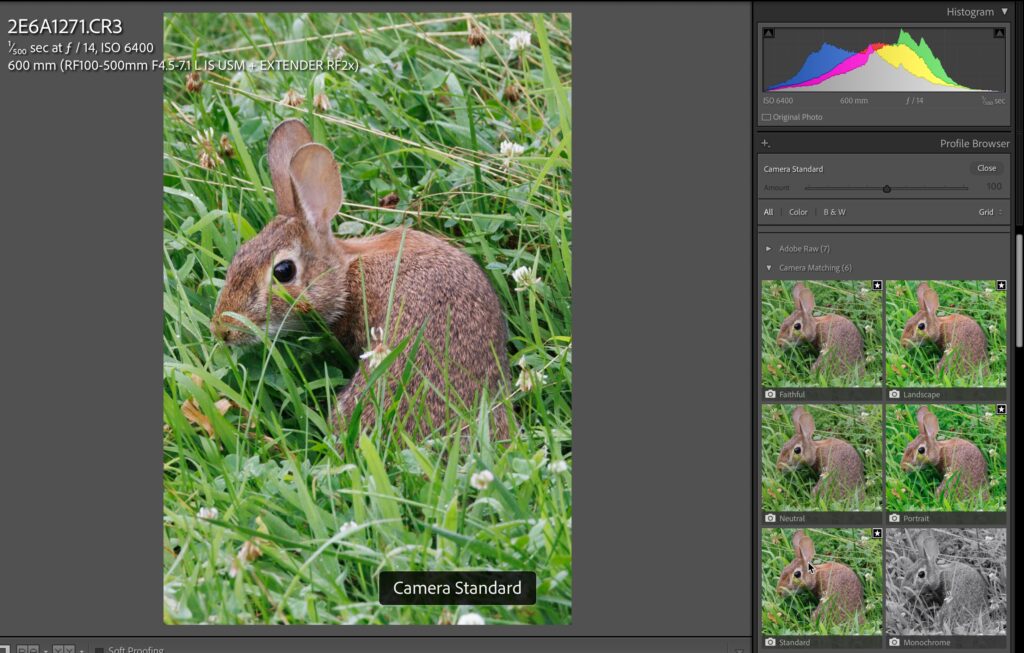
Profiles are like the picture styles you see in your camera, such as Portrait, Landscape, Standard, etc., and influence how the colors and tones in your image are initially interpreted. They’re often used to achieve different color grades or looks, and they primarily affect the color and tonal characteristics of an image, rather than individual editing adjustments. If you shoot in raw you can change the profile during postprocessing, but if you shoot in JPG the in-camera picture style is “baked into” the final image.
A preset can contain a profile but doesn’t have to. A profile can change the color and tone of your photo without affecting any of the Develop sliders, so choosing a desired profile first and then beginning your adjustments is a good way to begin an edit.
If you want to match the look of your raw photos most closely in LrC to how they appeared in-camera, then you’ll want to choose the camera matching profile that corresponds to the one you configured in your camera. LrC comes with a variety of built-in profiles that range from basic to creative looks. You can also create or import custom profiles to achieve specific looks.
I encourage you to take a few raw photos into Develop and explore all the presets in the Presets panel and all of the profiles in the Profile Browser to see how they work independently and together. As you become more proficient, you can create your own custom presets and continue to customize your raw default settings to begin processing your raw photos from the moment they are imported.
There’s clearly a lot more to learn about LrC, but I hope that these fundamental concepts will help you move forward with confidence.
The post Key Things Everyone Using Lightroom Classic Should Know: Part 2 appeared first on Lightroom Killer Tips.
Continue reading...
Understanding the Import Process
Importing photos into LrC is the process of bringing information about your photos from your memory card (or already on your computer) into the catalog for organization, editing, and management. The act of importing creates a database record for each photo you bring in, and that record is where all the work you ever do to each photo is stored. The import process can also include copying or moving photos to a new location, but that is a secondary function. To begin an import, open the Library module and click the Import button located at the bottom left corner of the screen.

Here are the key things to know about the Import dialog:
Choose a Source: Choose the desired source from which you want to import, such as a memory card or a specific folder on your computer.
Copy, Move, or Add: Across the top of the Import dialog, you need to choose what action you want to perform on your photos. The most common option is to choose Copy, which copies the photos from the source to a new destination. If the photos are already in the location you want them to reside (such as a folder on your hard drive) you can choose Add and no copying or moving of photos will occur.
Destination Folder: If choosing the Copy or Move option you next need to choose where you want LrC to put the photos being imported. You can organize your photos by date, location, or other criteria. Choose a scheme that makes sense to your brain and can scale easily into the future. Note, after import you can use LrC to move photos between folders and manage your photos, but you need to pick this starting location. If Add was selected you won’t see the Destination panel as the photos are already in their destination.
I’m going to take this opportunity to point out that it is in your best interests to only use LrC to move photos and folders around on your drive to keep the catalog up to date with these changes. If you move imported photos outside of LrC you will break the link between the catalog and the photos and create more work for yourself.
All the other options on the Import dialog are there to help speed up other aspects of your workflow, such as applying metadata or edits, but they are not required. In the beginning, refine your thinking about your organizational structure for your photos as that is super important over time. As you become more proficient, utilize the other Import dialog panels to multi-task the import process and save those settings as an import preset.
After importing, the photos will appear in the Library. From there, you can further organize, edit, and manage your photos using the various tools and features as you move through your workflow. Presets, profiles, and default settings are important tools to making your workflow more efficient, so let’s talk about what those mean.
Utilizing Presets and Profiles
While LrC can handle JPGs, PNGs, TIFs, PSDs, and even many video formats it has its roots in editing raw files. If you choose to capture photos in raw format then that image data has not been fully processed by the camera, which allows for more flexible postproduction choices down the road (such as changing white balance). When a raw photo is imported into LrC it has to apply some form of default settings to serve as a starting place for you to view, evaluate, and begin editing the photo. Out of the box, LrC has an Adobe designed default, and while there is nothing inherently wrong with that, you can customize your default settings to your liking. Creating a custom default requires selecting a develop preset that applies desired settings in the Raw Defaults section of the Presets tab of the Preferences.

People are sometimes confused about presets and profiles, so let’s clarify. Presets and profiles are both tools that allow you to apply specific adjustments and looks to your photos. However, they serve slightly different purposes and work in distinct ways:

Presets are simply a way to save a combination of adjustments (or even a single adjustment) in a file that you can apply to your photos with a click. They are essentially a collection of settings that affect various aspects of an image, such as exposure, contrast, color grading, and more. Presets are often used to achieve a consistent look across a series of images or to quickly experiment with different styles. LrC comes with a lot of presets in the Presets panel of the Develop module, but over time you can create your own custom presets or acquire presets from others.

Profiles are like the picture styles you see in your camera, such as Portrait, Landscape, Standard, etc., and influence how the colors and tones in your image are initially interpreted. They’re often used to achieve different color grades or looks, and they primarily affect the color and tonal characteristics of an image, rather than individual editing adjustments. If you shoot in raw you can change the profile during postprocessing, but if you shoot in JPG the in-camera picture style is “baked into” the final image.
A preset can contain a profile but doesn’t have to. A profile can change the color and tone of your photo without affecting any of the Develop sliders, so choosing a desired profile first and then beginning your adjustments is a good way to begin an edit.
If you want to match the look of your raw photos most closely in LrC to how they appeared in-camera, then you’ll want to choose the camera matching profile that corresponds to the one you configured in your camera. LrC comes with a variety of built-in profiles that range from basic to creative looks. You can also create or import custom profiles to achieve specific looks.
I encourage you to take a few raw photos into Develop and explore all the presets in the Presets panel and all of the profiles in the Profile Browser to see how they work independently and together. As you become more proficient, you can create your own custom presets and continue to customize your raw default settings to begin processing your raw photos from the moment they are imported.
There’s clearly a lot more to learn about LrC, but I hope that these fundamental concepts will help you move forward with confidence.
The post Key Things Everyone Using Lightroom Classic Should Know: Part 2 appeared first on Lightroom Killer Tips.
Continue reading...
