teerex
New Member
Deadpixel has very kindly given me consent to post his DIY Instructions to mod the Nikon D70 for IR here from irphotography.org.
If you have nerves of steel and want to take the plunge to do it yourself, this is a very good and detailed on how to DIY.
Deadpixel's Original Post
Thanks Matt.
Introduction
This post is my attempt to outline the D70 to D70i conversion process. I know that there are various sites out there that have done this too but I noticed that most are quick outlines that do not go into details about possible issues that a modder might encounter and some are just pages of technical details comparing a converted camera against an unconverted one. I hope to outline the process in a way that will reassure anyone wishing convert their own camera that it is relatively easy and safe. smile.gif
Disclaimer
I do not work for nor am I in anyway affiliated to Nikon. This conversion process is neither approved nor endorsed by Nikon.
You understand that:
* There is a risk of damage to your camera
* Your camera's warranty will be rendered void (no longer valid)
* I cannot be held responsible for any damage to your camera
Ok, with the necessay "un-pleasantries" out of the way, let's get down the the fun part... smile.gif
What you will need
* A small Phillips screwdriver - the type used for adjusting the screws on spectacles
* A small pair of needle-nosed pliers
* A fine blue/red marker
* A suitable piece of IRP filter cut to size (29.59mm x 25.27mm)
* A steady hand and some courage
Suitable IRP filters
* Hoya R72
* Hoya R90
* B+W 092
* B+W 093
* Tiffen 87
* Edmund Long Pass (ELP)
Under no circumstances should you use a Cokin 007 filter as the filter has tiny air-bubbles embedded in it that are invisible to the naked eye but that will look like footballs on your photos.
Preparing for the conversion
* Get your filter cut to the correct size
* Clean your filter, it must be completely clean of dust and streaks and there must be NO SCRATCHES
* Clean your work place
* Clean your hands
* Remove the lens and replace it with the body cap
* Remove the CF card and battery
* Take a deep breath
The Conversion
Step 1
Flip the camera over and remove eight screws from the base of the camera, these are the ones circled in RED in the image below:
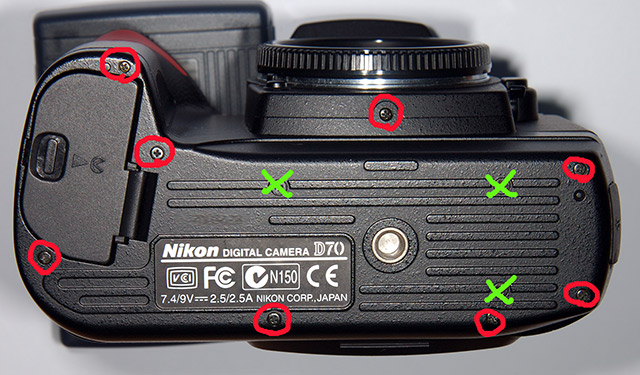
DO NOT remove the three screws crossed-out in green.
Step 2
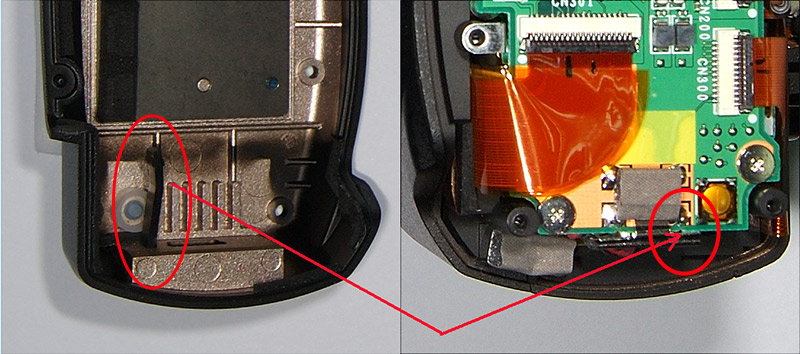
Carefully remove the base cover.
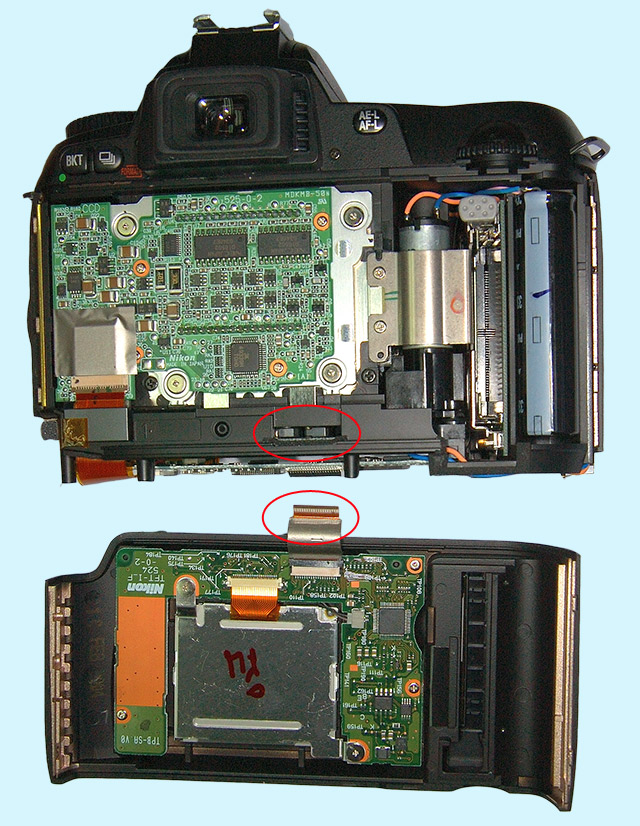
While holding the camera upside down with the LCD facing you, flip up the small, black holding-clip of the ribbon cable connector. Please refer to the image below:
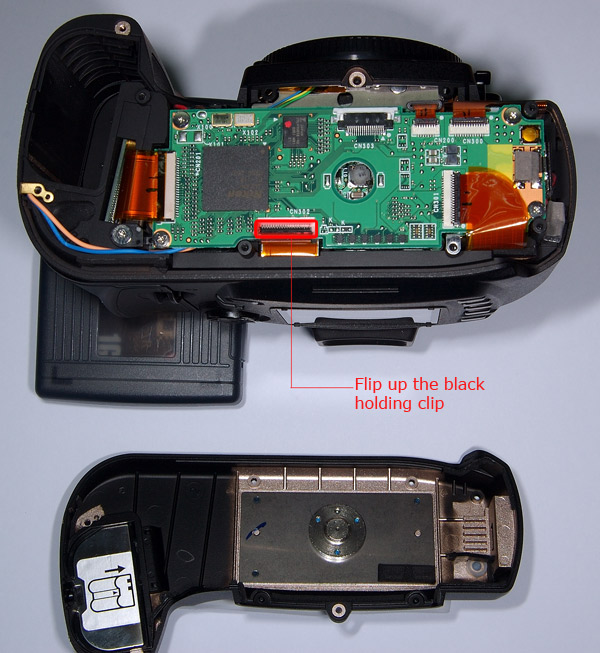
Gently pull the ribbon cable to disconnect it from its connector.
Step 3
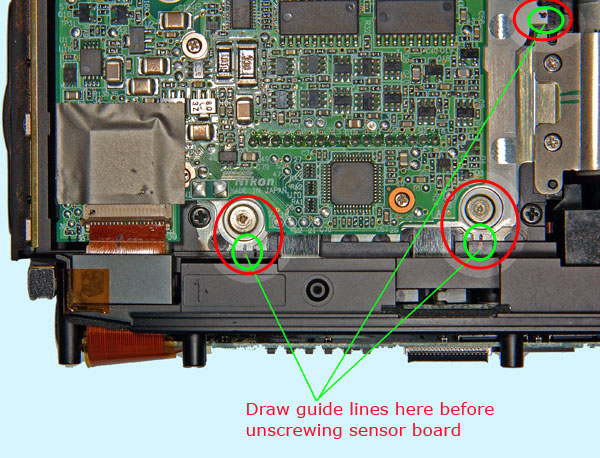
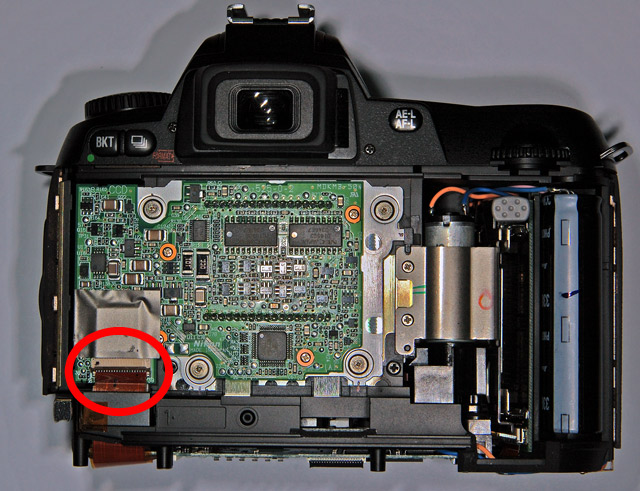
Unscrew the pair of screws from both sides of the camera:
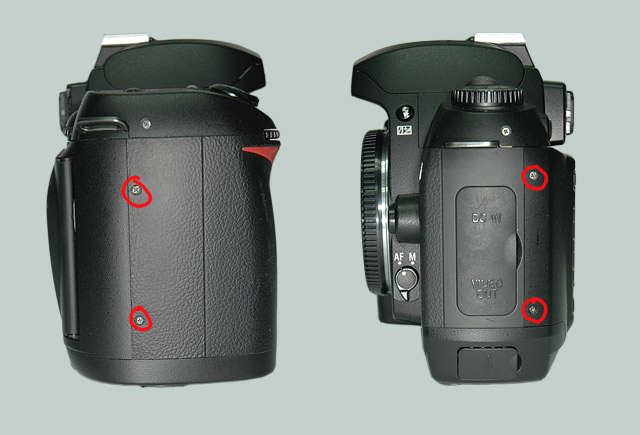
and remove the back cover with the LCD. Do this slowly and take extra care when seperating the ribbon cable, that is still attached to the camera back, from the main body of the camera:
Step 4
You're a third of the way in...
If you have nerves of steel and want to take the plunge to do it yourself, this is a very good and detailed on how to DIY.
Deadpixel's Original Post
Thanks Matt.
Introduction
This post is my attempt to outline the D70 to D70i conversion process. I know that there are various sites out there that have done this too but I noticed that most are quick outlines that do not go into details about possible issues that a modder might encounter and some are just pages of technical details comparing a converted camera against an unconverted one. I hope to outline the process in a way that will reassure anyone wishing convert their own camera that it is relatively easy and safe. smile.gif
Disclaimer
I do not work for nor am I in anyway affiliated to Nikon. This conversion process is neither approved nor endorsed by Nikon.
You understand that:
* There is a risk of damage to your camera
* Your camera's warranty will be rendered void (no longer valid)
* I cannot be held responsible for any damage to your camera
Ok, with the necessay "un-pleasantries" out of the way, let's get down the the fun part... smile.gif
What you will need
* A small Phillips screwdriver - the type used for adjusting the screws on spectacles
* A small pair of needle-nosed pliers
* A fine blue/red marker
* A suitable piece of IRP filter cut to size (29.59mm x 25.27mm)
* A steady hand and some courage
Suitable IRP filters
* Hoya R72
* Hoya R90
* B+W 092
* B+W 093
* Tiffen 87
* Edmund Long Pass (ELP)
Under no circumstances should you use a Cokin 007 filter as the filter has tiny air-bubbles embedded in it that are invisible to the naked eye but that will look like footballs on your photos.
Preparing for the conversion
* Get your filter cut to the correct size
* Clean your filter, it must be completely clean of dust and streaks and there must be NO SCRATCHES
* Clean your work place
* Clean your hands
* Remove the lens and replace it with the body cap
* Remove the CF card and battery
* Take a deep breath
The Conversion
Step 1
Flip the camera over and remove eight screws from the base of the camera, these are the ones circled in RED in the image below:
DO NOT remove the three screws crossed-out in green.
Step 2
Carefully remove the base cover.
While holding the camera upside down with the LCD facing you, flip up the small, black holding-clip of the ribbon cable connector. Please refer to the image below:
Gently pull the ribbon cable to disconnect it from its connector.
Step 3
Unscrew the pair of screws from both sides of the camera:
and remove the back cover with the LCD. Do this slowly and take extra care when seperating the ribbon cable, that is still attached to the camera back, from the main body of the camera:
Step 4
You're a third of the way in...