DIY Adobe Lightroom controller


spidey89

Moderator
Staff member
Jun 6, 2007
8,157
12
38
South Western Singapore
This is a thread to show how, through the use of a inexpensive MIDI USB controller (which is used in the music industry), and a free plugin, I put together a small, portable controller that I can use to controls most of the functions in Adobe Lightroom.

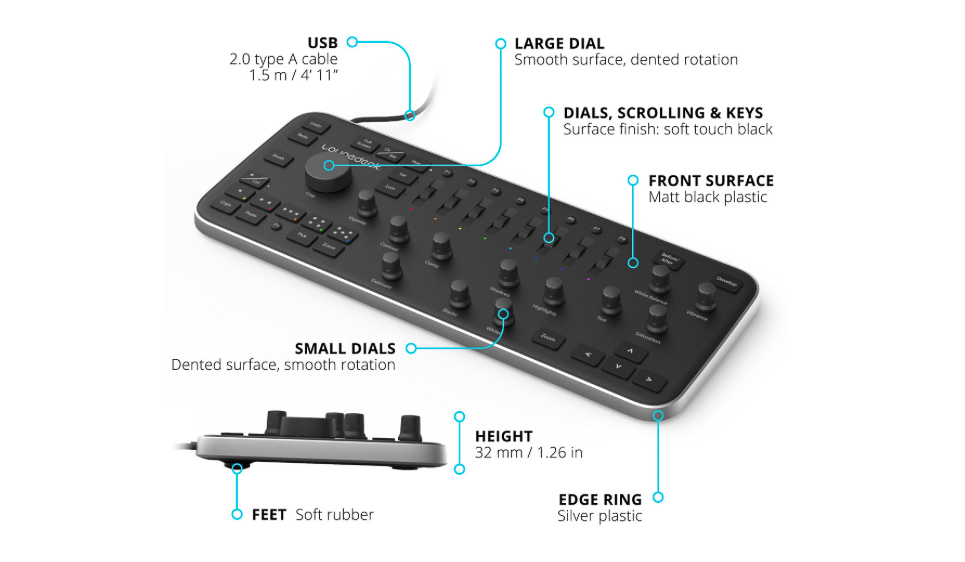
Some time ago, I saw this project on crowdfunding called Loupedeck, which is around USD$300 without shipping. It's nice, but it's big and pricey, I don't feel it's worth the cost, And honestly... It felt like it was a little messy too, but it was a ready made solution

loupedeck-lightroom-controller-pfixer-3.jpg


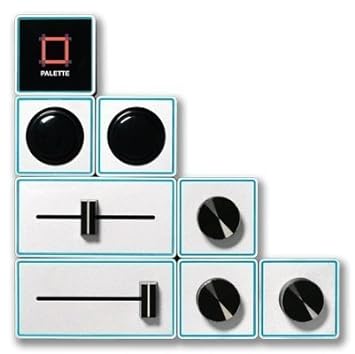
Some time later, I found an alternative called Palette which is a modular button, slider and dials system which can be used with multiple programs, not just Lightroom and I thought "Hey, sounds good, it's not a one trick pony, if the price is right, I'll go for it!" until I saw the price... USD$299 for a kit that has just only a main process doohickey,2 buttons, 2 dials and 3 sliders. So that was out...

41P7M-KEicL._SX355_.jpg


I then saw an article about a DIY version using freeware or paid ware then I thought that it was too much of a hassle. Over time, as I used lightroom to process my photos, I kept think back about the deck option and decided to read more in depth and realized it was actually quite easy to set up, just a little time consuming but it could be a weekend project.

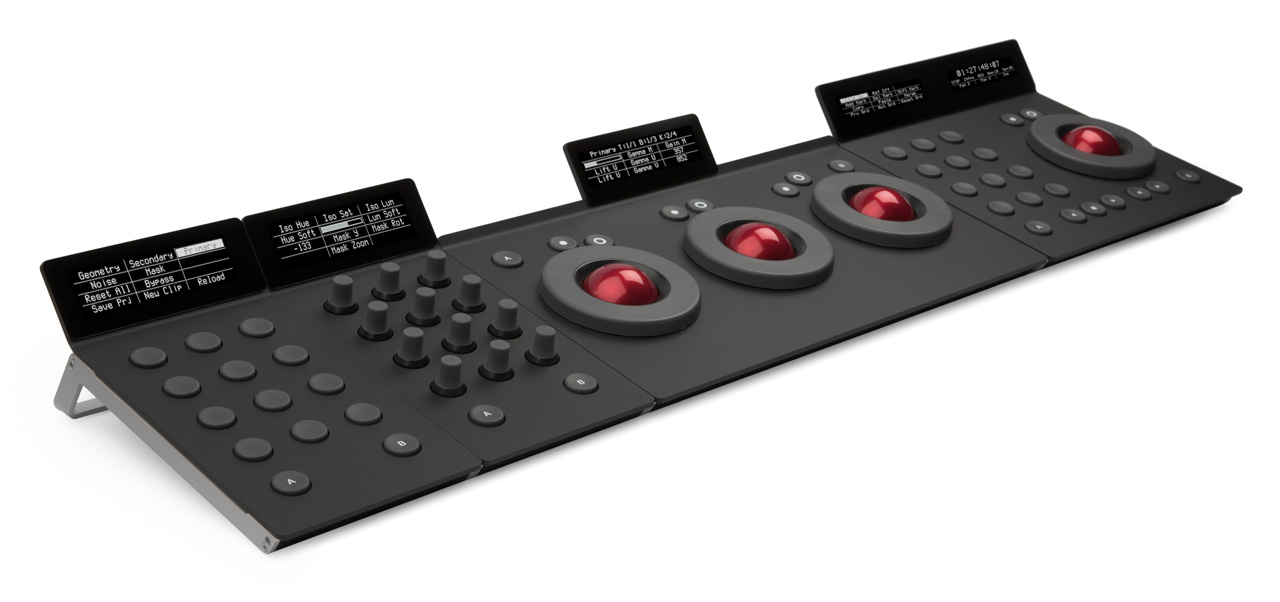
Other alternatives as suggested by others (for comparison) included the Tangent, which can be used for a multitude of programs but costs USD$3320.25! It's cool, full of buttons and dials, looks very profession but not space saving as my table is very small!

element_lg.jpg


Another alternative is the Pfixer by pusherlabs which seems to be a Mac OS X version only, so Windows users will still have to use the MIDI2LR freeware to do it. Pfixer offers the plugin only option, a few type of controllers or the software bundled with the controllers. The good thing is they print and place their own stickers for you, so you know which buttons and dials do what. I'm not sure if its customization though.

minimal_layers.png


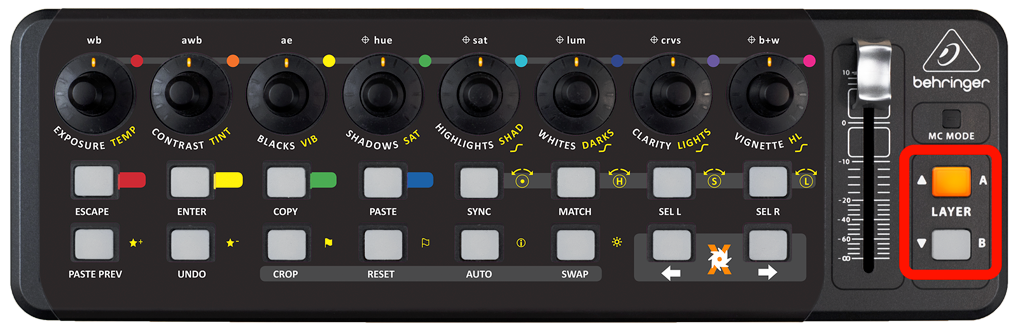
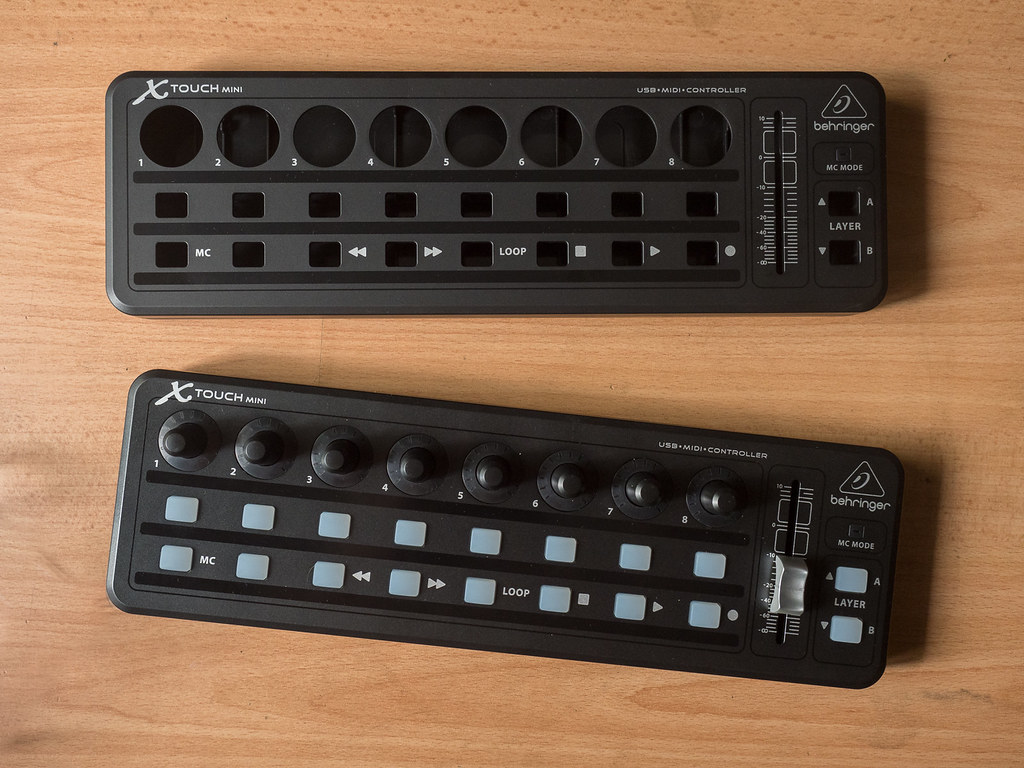
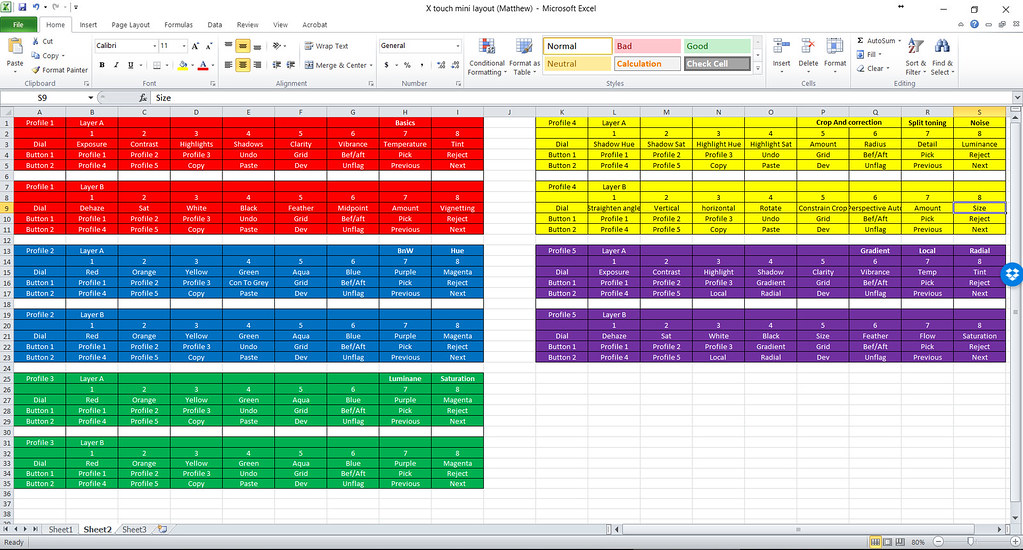
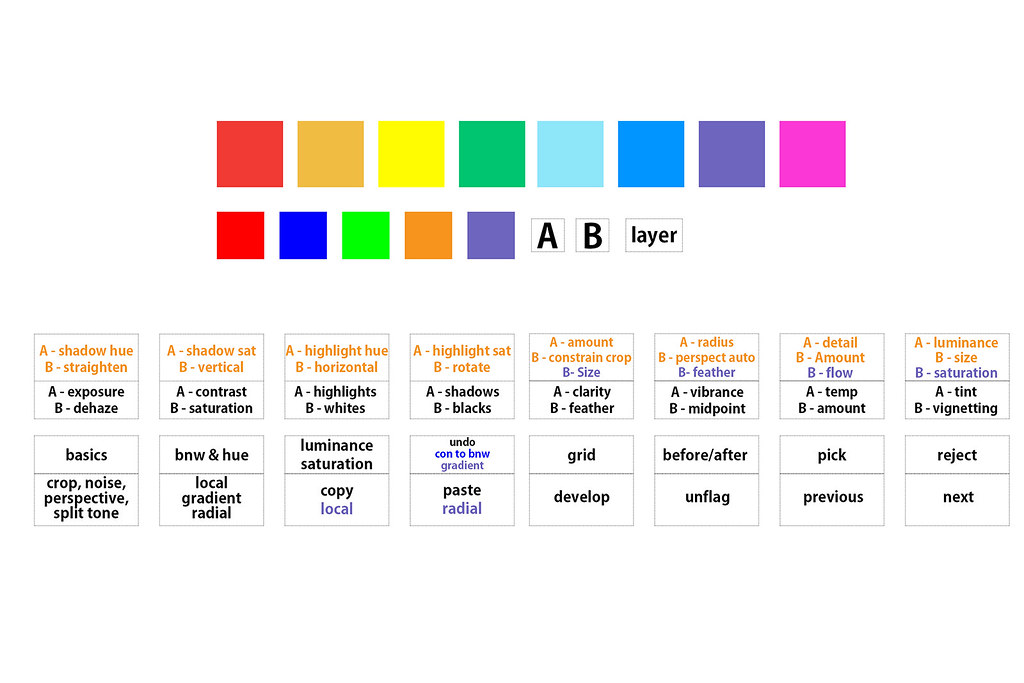
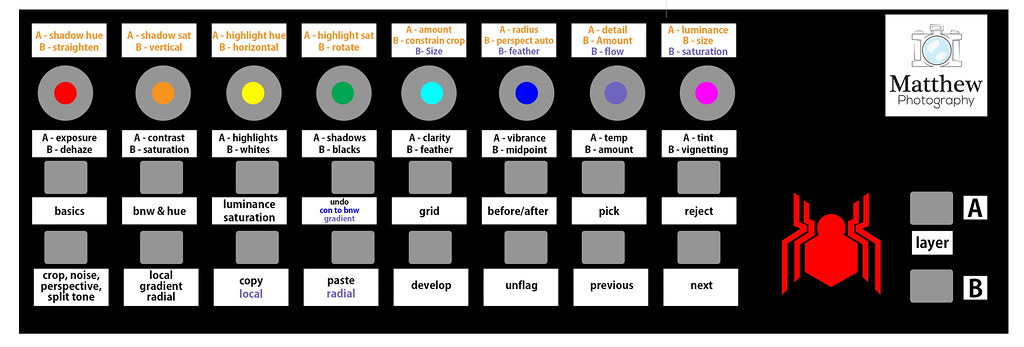
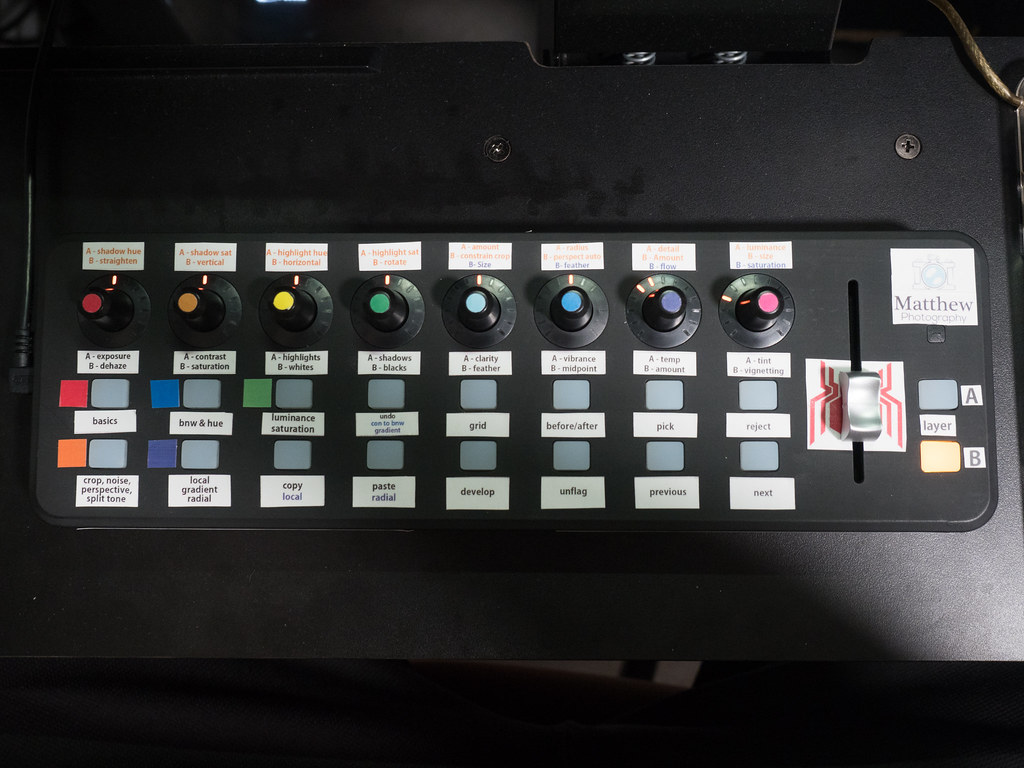
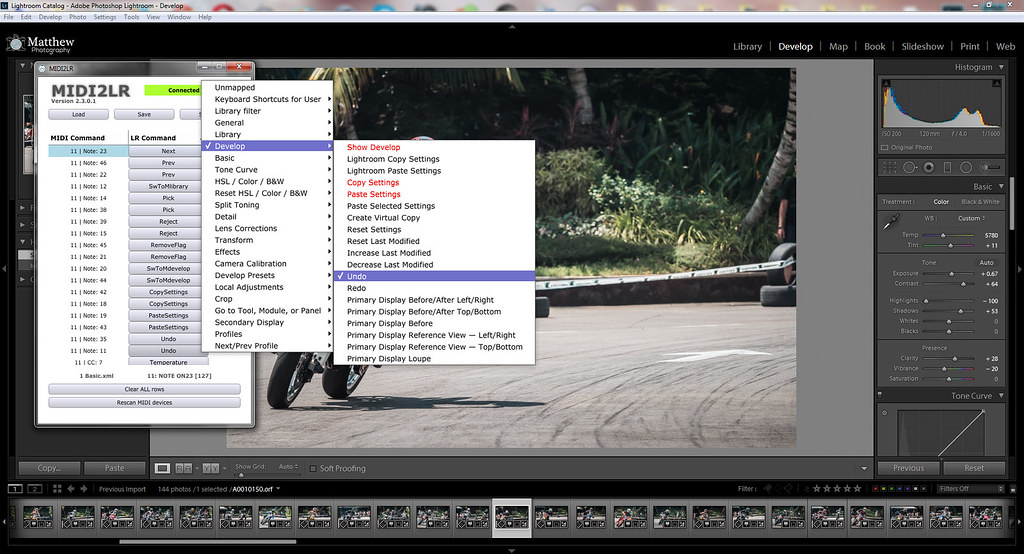
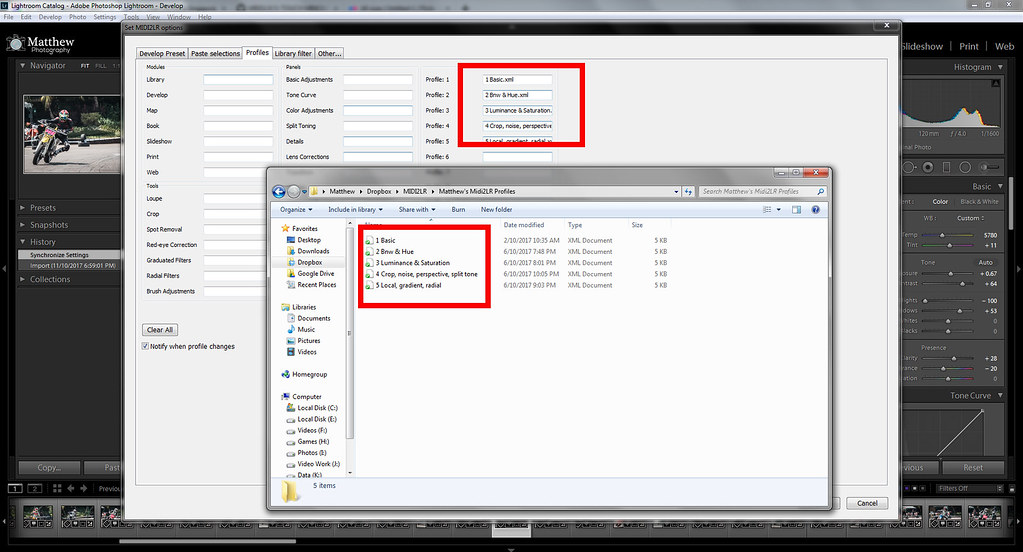
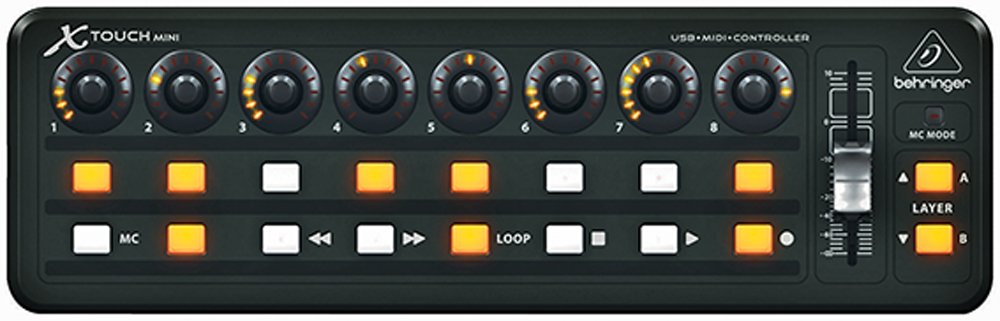
Midi2LR has a forum to discuss and help each other and searching in the forum, there is a list of compatible controllers of different brands and models, but I went with one that's used by many, the Behringer X Touch mini partly for size, number of buttons and dials and also because many people use it, meaning there's more help for it if I needed any.

51K6gV%2BA%2BAL._SL1000_.jpg


Of course there are bigger more expensive ones, if you have the space for it. Some with motorized faders (the sliders used to control audio volumes), which will move on it's own as you move from photo to photo, so each photo's unique settings is there, but I found it to be noisy and went with digital dials, they spin pretty much infinitely, but they rely on LEDs to tell you position. I end up just looking at the screen so it doens't matter
 

After getting the controller, first thing I did was dismantle the thing by pulling the plastic fader out and unscrewing 6 screws located behind. As seen in the picture. One belongs to my friend and the other is mine

37557861486_87701b710a_b.jpg


Next step was to prep for spray painting. I taped up the rubber feet and the information behind because I want to have reference as to what this thing is should I ever forget (unlikely, but I like it this way). The reason for taping is because the feet is gripper than the stick one rubber I bought, so I didn't want the paint to cover it and make it smooth.

Also, I saw a guy in the USA paint with a brush and the results looked quite ugly, I spray painted mind to hide the markings which can be ugly and distracting. Spraying it in matte black gives a nicer finish without distraction of gloss. I joked with my friend to spray paint it in shiny red paint.

37557860666_63e7f9f877_b.jpg


I sprayed the back and the sides to cover pretty much the entire thing. It's still wet in the photo hence the lines but once it dries, it's nearly gone to completely gone

37557859596_732bdc346a_b.jpg


Once it's dried, I had to wipe it down because it seems there are black particles that didn't adhere to the surface, put it back together and tested it and it was still working!

37557858556_aa6fd364a6_b.jpg


Looks like a professional piece of gear! You can actually stop here if you can memorize what does what but I went on to do labels for myself and for anyone who uses it if someone borrows from me. I can't remember them myself, hence the labels
 

Last edited:
First things first was to plan what you want each dials and buttons to do. The cool thing about this is that physically, it has 8 dials and 16 buttons, but there's 2 layers, so you can actually have 16 dial commands and 32 dial buttons. I planned my setup in Excel and have 5 profiles to do different things, such as the basics, perspective correction, split toning, bnw color controls etc.

37574513852_a0c3640e67_b.jpg


Once that was done, I entered Photoshop and started doing the layout in a 8.5 x 11 paper size canvas because the sticker I had was that size.

This resulted in the picture below. I reprinted layer A and B just because, the color squares represented which dials controlled which color, instead of using text like Pfixer. The smaller squares represented the profiles being used. I measured the space on the actual controllers and created 4 rows of 8 columns to indicate what each buttons and dials did. The smaller squares I previously mentioned tells me which profiles and corresponds with the text color.

The black text basically means its universal whereas the color text corrosponded to the profile. For example, my local, gradient and radial profile is purple, and the text in purple means that in that profile, those buttons controlled something different.

23753993588_2bb982f67d_b.jpg


Next thing I did was to do the layout on a "digital controller" in Photoshop, so that I can double check what goes where, as well as having a visual guide when sticking on the stickers. As seen below, I also placed my logo and a Spider symbol just for fun

37574509362_ac8973bc78_b.jpg


After all this is done, I printed it and I used 3M matt scotch tape to "laminate" the stickers so they're more resistant to the environment and won't wear out as easily, or fade if I have water drop on it, or touch it with wet hands. Then I started cutting it. My rolling cutter is too big and cutting something so small with scissors isn't easy so it looks ugly. You can use label makers but I'm not sure if they can control size and color the same way in photoshop.

For the round disc, I used a paper punch to punch out little disc and stick it on the top of the dials. The end result is decent, but probably with more skilled people cutting the stickers, the results would look better. I chose sticker paper because the white sticker will allow the text to stand out better

37348009260_c6e2e5f0f9_b.jpg
 

Last edited:
[video=youtube;NSQl1txZOmc]https://www.youtube.com/watch?v=NSQl1txZOmc[/video]

Here's a video link that my friend shared to mapping the keys, but it's pretty simple. The steps I'm doing is for computers running PC. I'm not sure about Mac but there are information out there for you to look.

Firstly, you got to use a Windows based PC to change what each keys does. Cause some keys play the same note, so when you want to map it, 2 keys may do the same thing. Here's a link to Dan Orst's blog that has download to loading the hardware customization. Once you're done, install Midi2LR.

So basically, after installation, when you start Adobe Lightroom, MIDI2LR should boot up as well. Under settings, click on "Enable Pickup Mode", there's an explanation as to what it does. Under Profile, point it to where you save your profiles for different settings. It's recommended to save inside a Dropbox folder if you use multiple PCs like me, or just plainly for backup purposes. They're tiny files so no worries.

To start from scratch, on the controllers, press or rotate each dial and buttons in layer A, then layer B. Once you're done, you can start mapping it in a systematic manners. I started with rotating the dials, it will automatically highlight the note and then I just click what I want it to do. After I'm done with the dials, I moved on to the dials button (you can depress the dials). Then I moved on to the buttons and then repeated the process in layer A.

23781016728_6eb65c83a4_b.jpg


Once you're done, save it!

To have more than 1 profile, copy and paste and remap it by changing what each button does. You have to rename each profile. For example, 2 of my profiles are "basic" and "bnw & hue" which obviously does the basic settings in lightroom and black and white color channels and hue settings. They're saved as 1 Basic.xml and 2 Bnw & Hue.xml. Once you're done mapping, each profile and saving it individually, open Lightroom.

Under files, plugin extras, under MIDI2LR, click on options then navigate to the "profile" tab, there are 10 profiles which link to the mapping of profiles. I have 5 buttons dedicated to 5 profiles, as seen in my excel file and sticker layout. Make sure the file name matches the name in the options as seen in the screenshot.

37634557231_e3e061614c_b.jpg


Once that is done, you should have a fully working budget DIY Adobe Lightroom controller!

Also, the same friend who showed me the video, shared a link through googling (I didn't think of that!) where someone has done an x touch mini sticker design that's suppose to be form fitting for the controller! It's a layered version so if you're comfortable, you can actually make edits to it, or just use his and stick it onto yours. As ugly as mine is, I'm perfectly happy with the way mine is done
 

Today, I've been using this for almost 2 weeks and honestly... Presently... I'm just as fast using the controller as I am with using a keyboard and a mouse but it could be muscle memory but I believe I can be faster over time with the controller. One reason I got the controller was to make more precise adjustment to things like straightening angles, split toning and perspective correction where mouse control doesn't make it very convenient.

You can switch between settings using the period and comma keys, but you have to press multiple times to get to something further down. Or do a click on a particular setting so the controller is a wee bit faster since you can just move your fingers over different keys and even do things simultaneously, but that would be confusing.

Is it worth the effort to buy, wait, spray paint, decide on the functions, do the layout, print, laminate, cut and stick? Absolutely! Would I want to do it again, definitely not!

Is this for everyone? No that's for sure, some will hate it, some will love it. When I was doing the initial order, I asked a group of friends of 6 people. 1 said he'll see how mine works, 1 said yes and the remaining said no thanks for various reason.

I got this to work in tandem with my main PC at home as well on location with my Lenovo X1 yoga, which is a laptop that can fold into a tablet, and my friend uses a Microsoft Surface which is essentially just a tablet. He says this is a God send because he can lie down and edit. I won't judge him even though I laughed at him but he has a point.

For me when I travel, I don't usually have a good workspace to do and my laptop doesn't have the full keyboard with numpad, so for example when on the plan. I can fold my X1 into tent mode and just have the controller on my lap and edit the photos. Or even sit in a vehicle when someone is driving and just be processing photos on the spot for clients. I've tried processing my photos in tablet mode with the included stylus, HORRIBLE EXPERIENCE! Simply because the pen glides effortlessly which makes precise adjustment difficult. Using a keyboard has similar problems, choosing which attribute to make changes to is difficult.

So I highly recommend this method of processing photos if you don't like to sit in front of your computer with a keyboard, or looking for a more usable option to process your photos. Personally, I think this method is fun, makes me feel like a DJ hahahah! But also, I'm getting faster the more I use it, I can just grab the dial and be right most of the time.
 

hi i am interested to make one for myself too... How much do you think it is gonna cost?