Need Advice: Digi-Cabi broke down


qwerty02

New Member
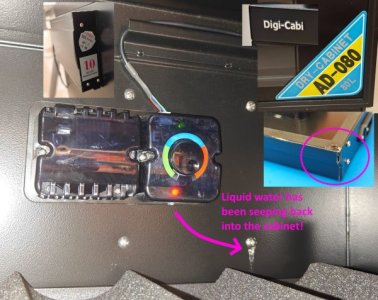
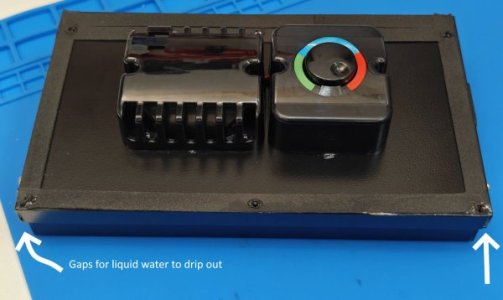
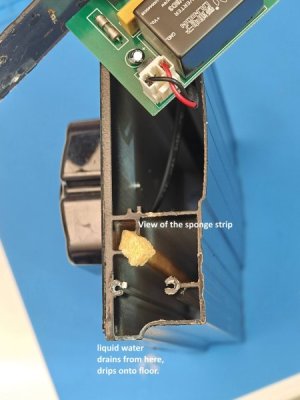
Hello! Wondering if I can ask your opinions on this matter: My Digi-Cabi AD160 (160L size dry cabinet) electronic dehumidifier unit stopped working a few days back. As I've been busy, I haven't had the time to send it in for repairs so I chucked a thirsty hippo into the BOTTOM of the cabinet. Interestingly, the hygrometer at the TOP of the cabinet generally reads about 35-50% RH, spending most of its time in the 45% area. I'm wondering: Since the reading is actually quite satisfactory, do you folks think I should forget about repairs and just use a thirsty hippo?
The manufacturer says to replace the electronic unit will cost $80-$160 but because my cabinet is more than 5 years old, the parts may no longer be available requiring me to buy a new cabinet.
I keep camera lenses and astronomy telescopes in the cabinet.
What do you folks think? Thanks! :)
 

Last edited:
Just repair it and it will be good for many years.
 

Do you use a bicycle lock to lock a Harley Davidson bike?

160L is not a small dry cabinet, it can stores quite a lot of gears isn't it? So how much is your gears total worth and what is repairing cost of $160 to that?
 

Last edited:
AD-160 is quite a big unit, bringing the whole unit down might be challenging. No wonder they asked you to get a new one. :bsmilie:

Get the unit repaired, unless you like to have squeaky lenses. Thirsty hippo is just a stop-gap measure, you cannot control the humidity level, having the humidity level too low will give you mickey mouse lenses for sure. ;p

If you are technically inclined, you can remove the dehumidifier unit and the LCD/LED display and bring to the service centre for checking and replacement. It's easier than bring the whole unit down.

Bring cash when you are at the service centre, they don't accept other modes of payment. Also, call before you go down, don't make wasted trips.

Their operating hours and location >> http://www.digihub.com.sg/servicing.html.
 

Since we are on Digi Cab Dry Cabinet, I have some issues which I do not know whether it is a problem.

I bought the Professional Series. So, according to the manual, I just set the Humidity level (which I set to 45%) and if the cabinet is absorbing the moisture, the green light will be ON until it reach 45% after which the green light will be turned off.

The problem with mine, is that the Dry Cabinet, after 2 days is still at 46%. So, the green light will be not be turn off until it reached 45%.

So, why is my cabinet stucked at 46% ?

Thanks
 

The manufacturer says to replace the electronic unit will cost $80-$160 but because my cabinet is more than 5 years old, the parts may no longer be available requiring me to buy a new cabinet.

You can do as AJ23 suggests, unscrew the rear dehumidifier unit and bring that down? Although I dunno if it's anymore complicated on your unit.

I recently needed to repair my 6-yr-old AD-60. When I enquired thru email, they said it would cost approx $80-$90 odd for units older than 5 years. So After bringing it down, they assessed that actually it could be repaired just by changing a part, as opposed to replacing the whole unit, so it ended up costing me just $30+.

Is your humidity reading purely from the built-in meter? Just a note of caution that it might be inaccurate. After comparing with two calibrated meters, the built-in meter in my AD-60 is about 10units off. E.g. When it shows 50%, the actual reading is 60%.

I'd just get it repaired. Peace of mind is worth it. It's not something you want to think about all the time. Like you said, you've been too busy to send for repairs... you can also be too busy to constantly monitor the RH and lifespan of your thirsty hippo :bsmilie:
 

Thanks everyone for your suggestions!
Catchlights: Agree its important to protect several thousands of optical equipment properly. In this case they way I see it is that the Thirsty Hippo seems to be doing as good a job as the electronic module so I'm wondering if the repair is really worth it.
AJ23, thanks very much for the detailed advice! Yup, that's pretty much what I'm intending
Kandinsky: Thanks for sharing your experience. I agree its probably worth a try: If its that cheap to repair then its worth it. Agree with you also on the meter calibration. I've never had 2 hygrometers exactly agree with each other. Having said that, 35% RH is a pretty good place to be at :)
RyanKhoo: Perhaps that's because the unit switches itself off exactly at 45% but when it does so there will be a gradual increase in the humidity as the cabinet is unlikely to be COMPLETELY airtight. Hence the humidity ticks upwards to 46% and the unit comes on again!
 

Regarding the thirsty hippo method, you will have to remember to change it once in a while.... which I find it too troublesome.
 

RyanKhoo: Perhaps that's because the unit switches itself off exactly at 45% but when it does so there will be a gradual increase in the humidity as the cabinet is unlikely to be COMPLETELY airtight. Hence the humidity ticks upwards to 46% and the unit comes on again!
I think you are correct.

You see, when I set at 45%, the reading always stuck at 46% and the green light remain ON.

To do a test, I now increase it 47% and the cabinet now stuck at 48%.

So, it looks like the green light in my dry cabinet cannot be OFF !!

U have this problem or not ?

Thanks
 

About my Digi-Cabi AD-080. Purchased Jan 2016, so now 8+ years old.
At first the display became harder and harder to read,
Then the humidity inside appeared to become higher ~ 55% RH even when the knob is turned to full clockwise (red side), making the green LED become brightest.

I googled about it, and found other discussions about the poor design and poor quality this dry cabinet. e.g. https://witonosfreestyle.wordpress....-dry-cabinet-and-made-2-shocking-discoveries/

Start disassembly via the 6 screws on the inside back wall.
 

Attachments

  • digi-cabi problems IMG20241110094852.jpg
    digi-cabi problems IMG20241110094852.jpg
    73.6 KB · Views: 54
  • cut IMG20241110104349a.jpg
    cut IMG20241110104349a.jpg
    46.3 KB · Views: 50
  • IMG20241110103925a.jpg
    IMG20241110103925a.jpg
    33.2 KB · Views: 47
  • IMG20241110104254a.jpg
    IMG20241110104254a.jpg
    42.1 KB · Views: 44
  • IMG20241110110220a.jpg
    IMG20241110110220a.jpg
    50 KB · Views: 50
Last edited:
(continuing)
I found that the power supply (rating 3.8V, 6W) was weak but not completely dead. I measured about 2.5V when the knob was at full-right, and about 3.0V when then knob was mid-way. The heatsink was able to get slightly cool, if I did not imagine it.

I cut off the red and black wires at the output of the board, threw away the board, and connected a 5V 2A wall wart instead. The heat sink was able to get very cold within like 1 min. Yes 5V is more than the stock 3.8V, and I will soon find out if this causes something downstream to fail.

Anyway, the handling of the condensate seems to be designed for flowing to the low corners of the main aluminium extrusion and drip out the 2 gaps at the bottom corners. The end caps of the extrusion are actually made of dark-translucent plastic, it is molded to leave the tiny gaps for liquid water to drip out onto the floor. But you can see that there are mounting holes at the bottom of the extrusion too, and you can see stains indicating that liquid water has been seeping back into the cabinet via the holes. This robs some efficiency. You can experiment with drilling holes in the plastic endcaps to allow condensate to evaporate directly from the sponge instead.

After supplying 5V, the LCD display remains difficult to read, Still no backlight, can only make out the LCD segments when your eyes are lower than the display.
 

Attachments

  • IMG20241110095012aa.jpg
    IMG20241110095012aa.jpg
    41 KB · Views: 52
  • wall wart IMG20241110111840.jpg
    wall wart IMG20241110111840.jpg
    36.6 KB · Views: 57
  • back view IMG20241110130924a.jpg
    back view IMG20241110130924a.jpg
    31.4 KB · Views: 49
  • IMG20241110133134.jpg
    IMG20241110133134.jpg
    41.6 KB · Views: 41
  • IMG20241110133105.jpg
    IMG20241110133105.jpg
    38 KB · Views: 53
Last edited:
Nice project! :) maybe when mine breaks down the next time i'll try this when the power dies again!
 

Back
Top