RSSNewsFeeder
Member
If you’re an Adobe Creative Cloud subscriber then you should know about Adobe Photoshop Lightroom on the web, or simply Lightroom web, as it is sometimes called (FYI, there no connection to the Web module in Lightroom Classic). This is a browser-based version of the Lightroom app that uses the cloud to store and sync photos across platforms. While not as full featured as the Mac/Win/iOS/Android versions of the app, there are a few things you can only do here in Lightroom web, so let’s take a closer look. [Editor’s note: this article first appeared in the August 2023 issue of Photoshop User.]
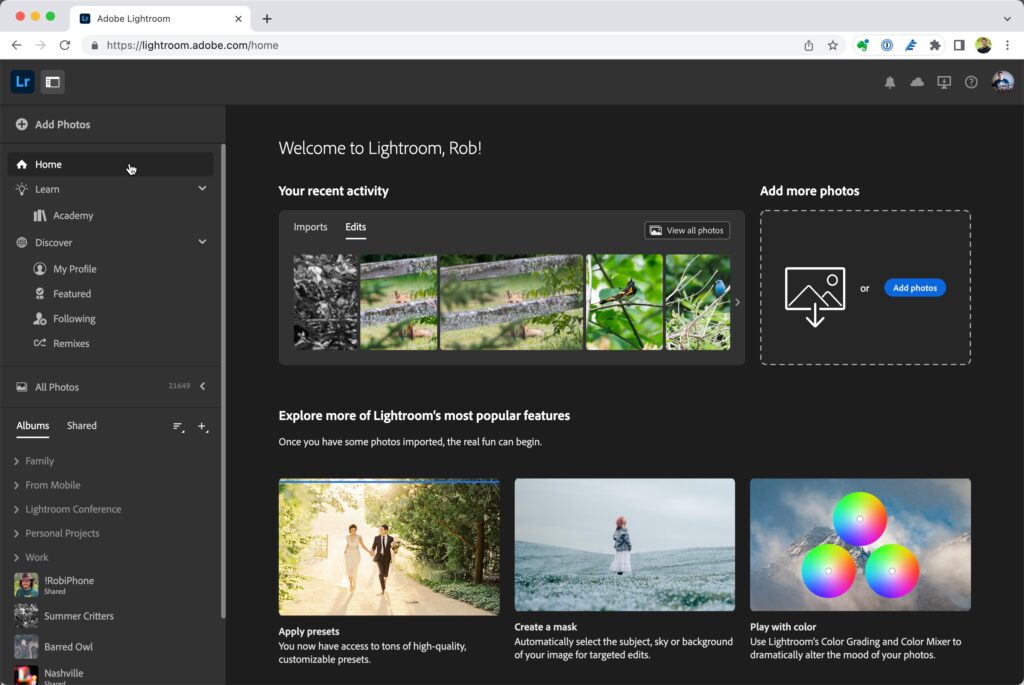
To get there, just point your browser of choice to lightroom.adobe.com and sign in with the same Adobe ID and password you use for your Creative Cloud subscription. If you’ve already synced photos from Lightroom Classic or imported directly into one of the Lightroom apps, you’ll see those photos are already here. From the Home screen you can easily access recently added and edited photos, add new photos through your browser (full resolution photos that will be uploaded to the cloud, synced across Lightroom apps, and count against storage), access folders and albums, explore the Learn and Discover features, and quite a bit more. Along the top of the interface are icons for viewing notifications, checking cloud storage quota, downloading the desktop and mobile apps, accessing help and support, and accessing your account info and Technology Previews.
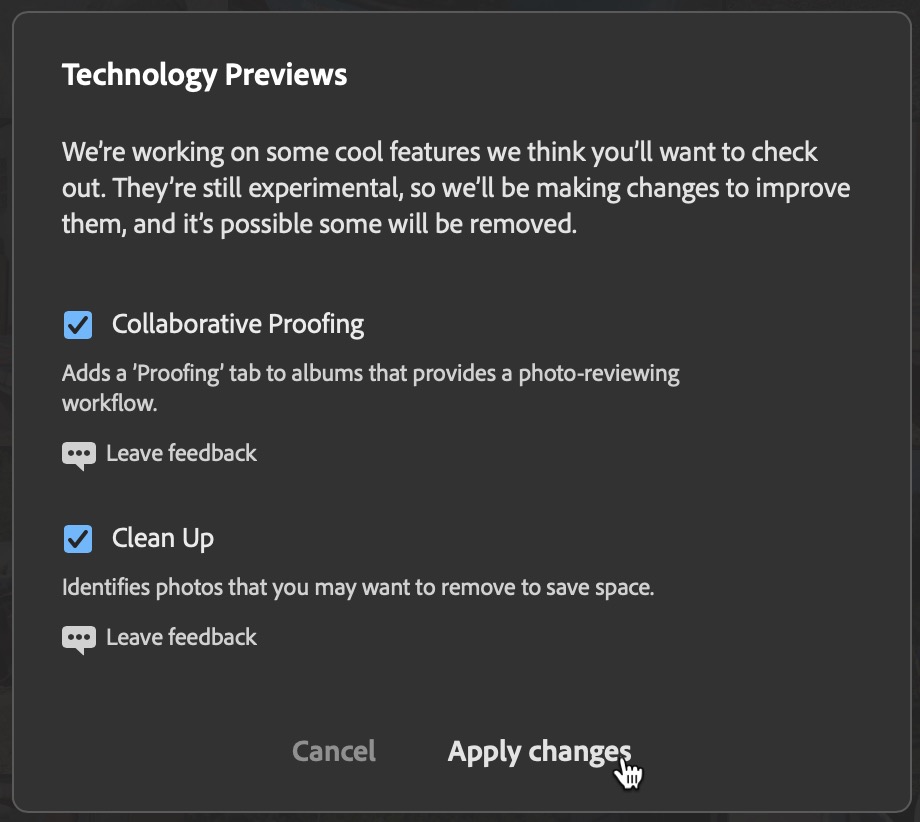
Technology Previews are a sneak peek into new features that aren’t fully formed but are functional enough for customers to test drive and give feedback to the Lightroom team. At the time of writing this there are two available, Collaborative Proofing and Clean Up. Collaborative Proofing has been around for a few years now as a tech preview. Clean Up is relatively new, and once enabled you’ll find a Clean Up menu item under the All Photos grouping on the left panel. Adobe doesn’t provide any glimpse into what’s under Clean Up’s hood, and simply states that it identifies photos you may want to remove to save space. Looking at the photos it suggested for me I can see it doesn’t like photos that are blurry or poorly exposed, such as these shots from my trail camera.
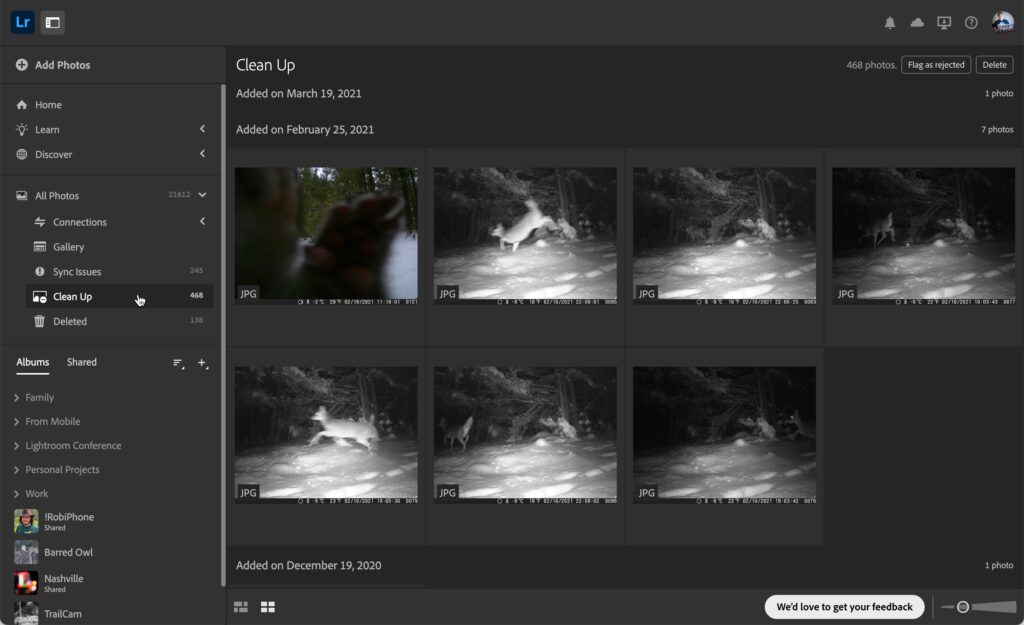
You can go through the photos it gathers arranged in added date and select photos that can either be flagged as rejected or just outright deleted. You can use CMD+A (PC: Ctrl+A) to select all and mark them all at once, but I wouldn’t recommend that without going through them all first, as it doesn’t like intentional blurring such as panning or slow shutter shots and really hates screen captures. Housekeeping is important, and tools like this can be helpful, but you still want to be in the driver’s seat. If you use it, be sure to click the Feedback button and let Adobe know what you think.
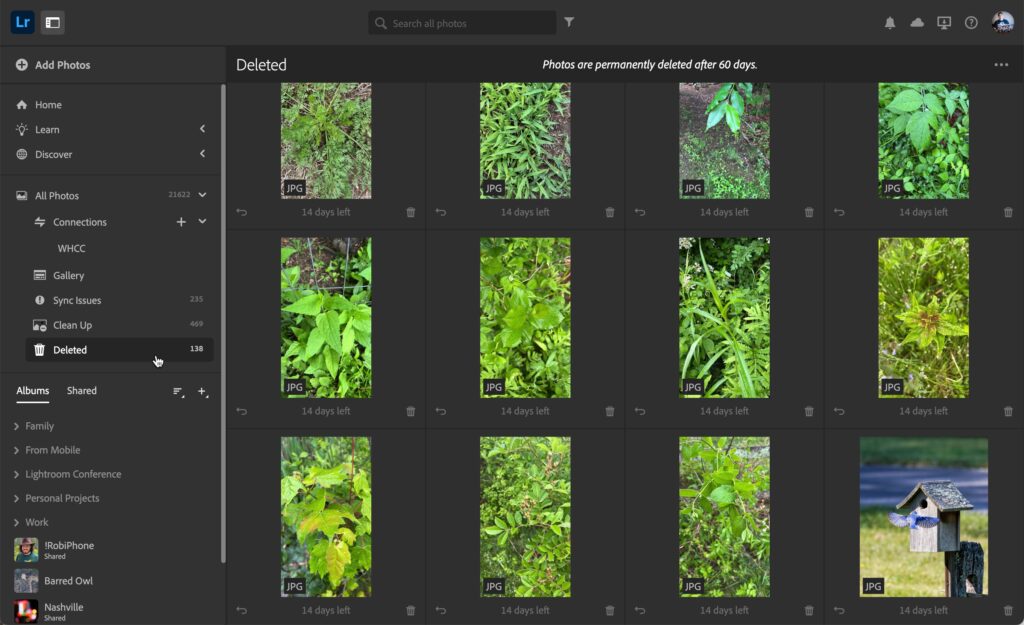
Grouped along with Clean Up you’ll find access to your Deleted photos (you’ve got 60 days to restore before they are automatically removed for good), Sync Issues (which groups photos having any sync related issues, which can help you identify where a problem may exist, such as in my case I had shut down Lightroom on my laptop before syncing had completed), Gallery (learn how to set up a Gallery), and Connections (these are also found in the Mac/Win version of Lightroom and allow you to send photos to online print services).
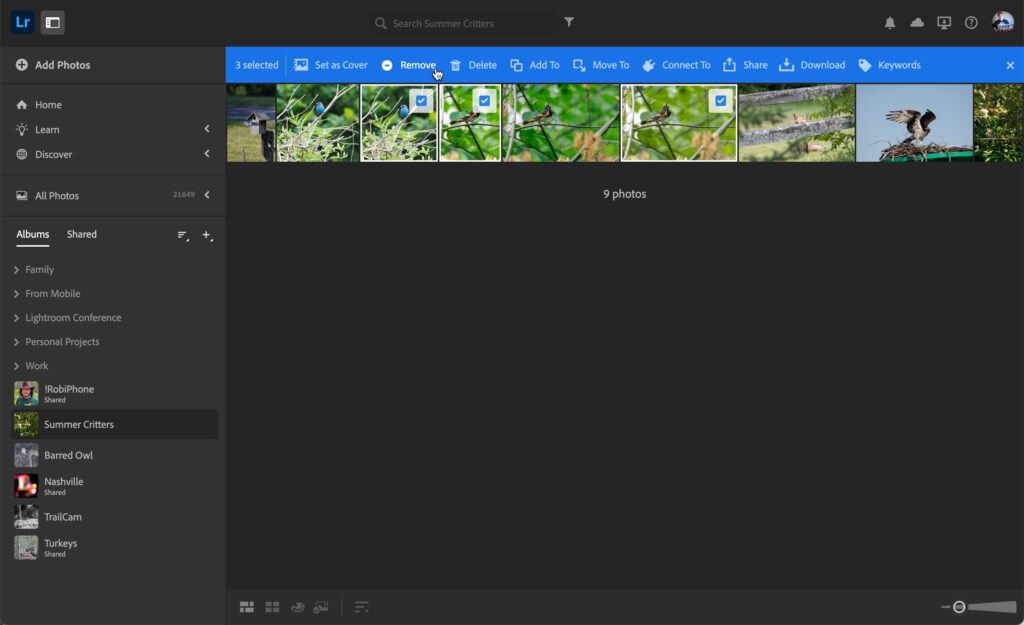
When working with your photos, you can add and remove them from albums, create new albums and folders, add and remove photos from storage, share them with others, and most amazingly edit them with much of the same functionality we have in the other Lightroom apps. To see your options, select an album, then select a few photos within it to activate the blue bar above the thumbnails. Here you’ll find the options for setting the cover photo, removing photos from the album, deleting them from the cloud, adding to another album, moving to another album, adding them to a connection, sharing them with others, downloading them, or applying keywords. In this case, I’m going to click Remove to remove these duplicates from the album.
Clicking on a single photo will switch to showing that one photo in a loupe view, where you can apply flags, ratings, keywords, title, and caption (click the i icon to access title and caption fields as well as see more information about the photo). From this view you can also access the suite of editing tools along the right panel and download and share icons along the top. Clicking the X button returns you to the Grid view. The editing tools available here are limited compared to the full apps, but still plenty powerful for something you access in a web browser.

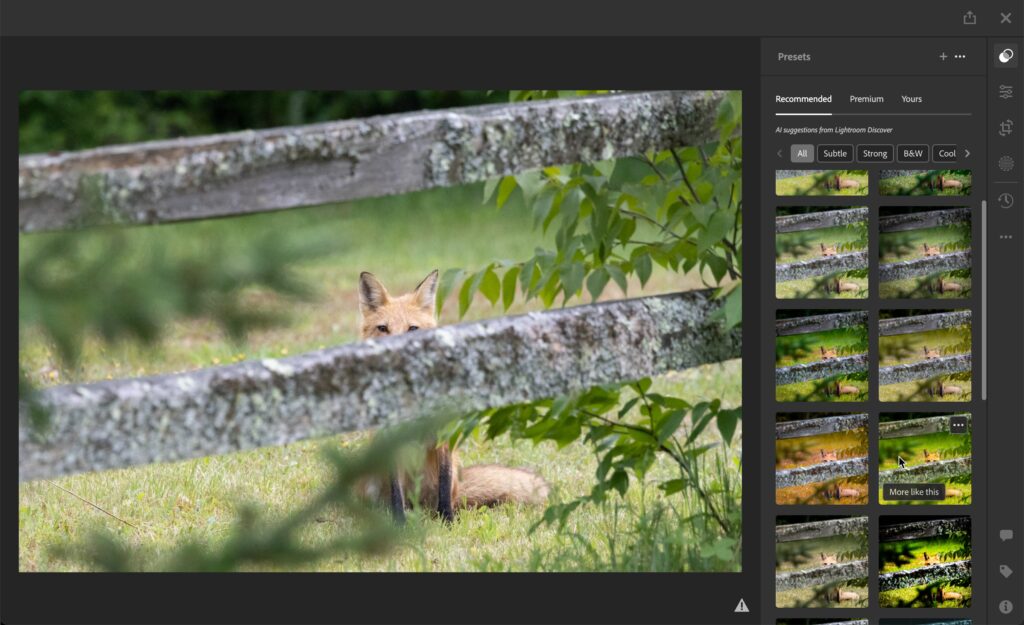
The icon at the top will take you into all the presets that ship with Lightroom, your own custom presets, as well as presets recommended by Lightroom’s AI from the larger community. These can be a great way to explore looks and start from a different place.
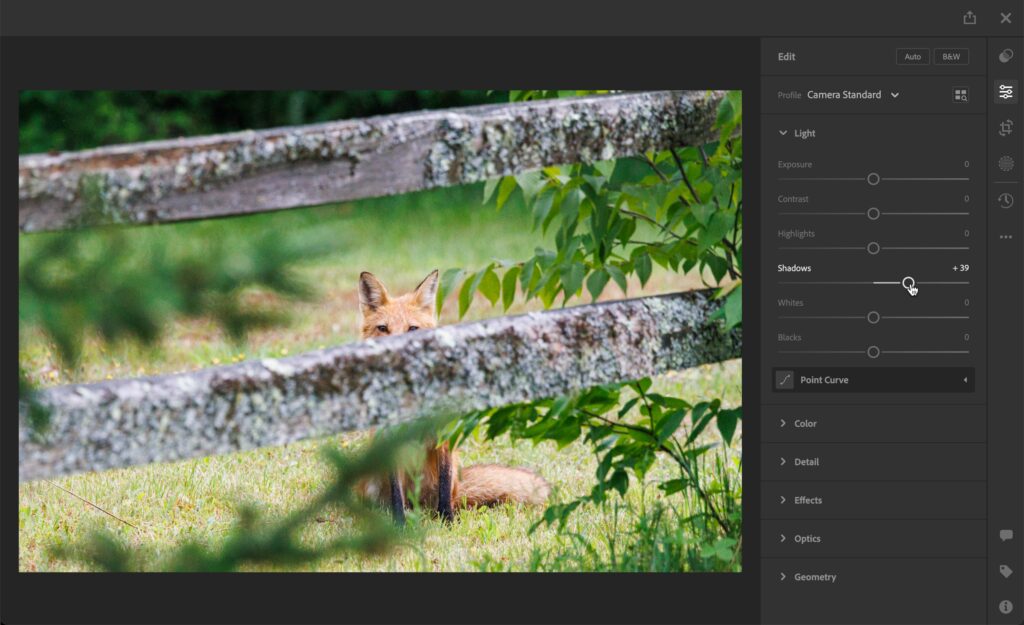
Whether you apply a preset or not, the next icon down will take you into the editing suite where you can customize things to your taste. You’ll find the Light, Color, Detail, Effects, Optics, and Geometry panels waiting for you to adjust and get real-time updates as you go. These edits are then synced across all other Lightroom apps. If cropping is desired, click the Crop tool icon and fine tune your composition. When finished, click the X at the top to keep your edits and return to Grid view.
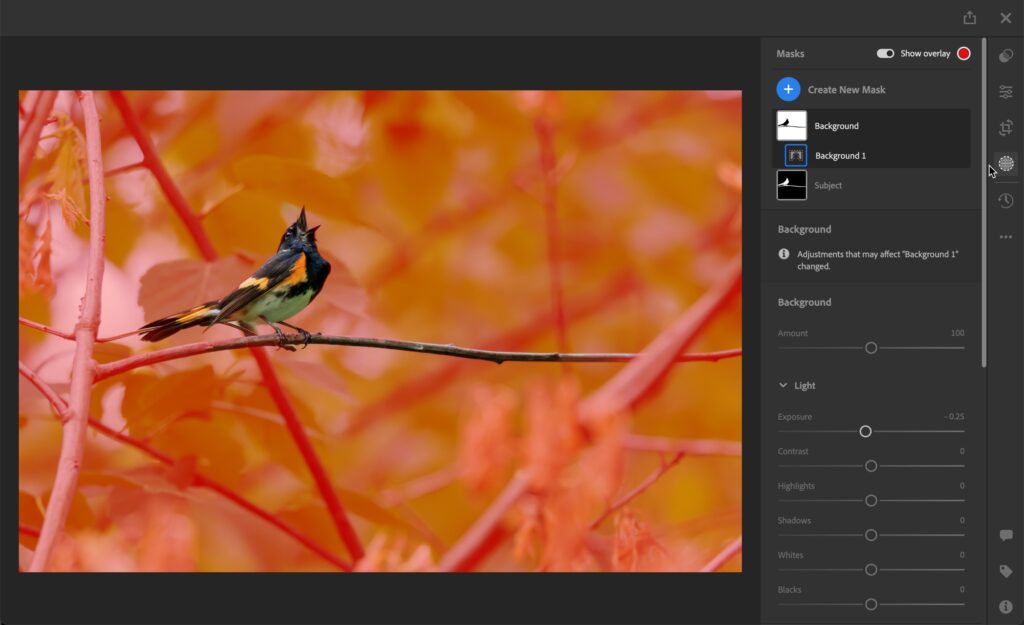
The Masking tools have been updated here as well, though not as full featured as you may be used to in other Lightroom apps. With a photo in Loupe view, click the Masking icon to edit existing masks or create new ones. The mask types are currently limited to Subject, Sky, Background, Radial Gradient, and Linear Gradient, though Adobe says more options will be coming in the future. When adjusting a mask’s settings, we’re limited to Light, Color, Effects, and Detail.
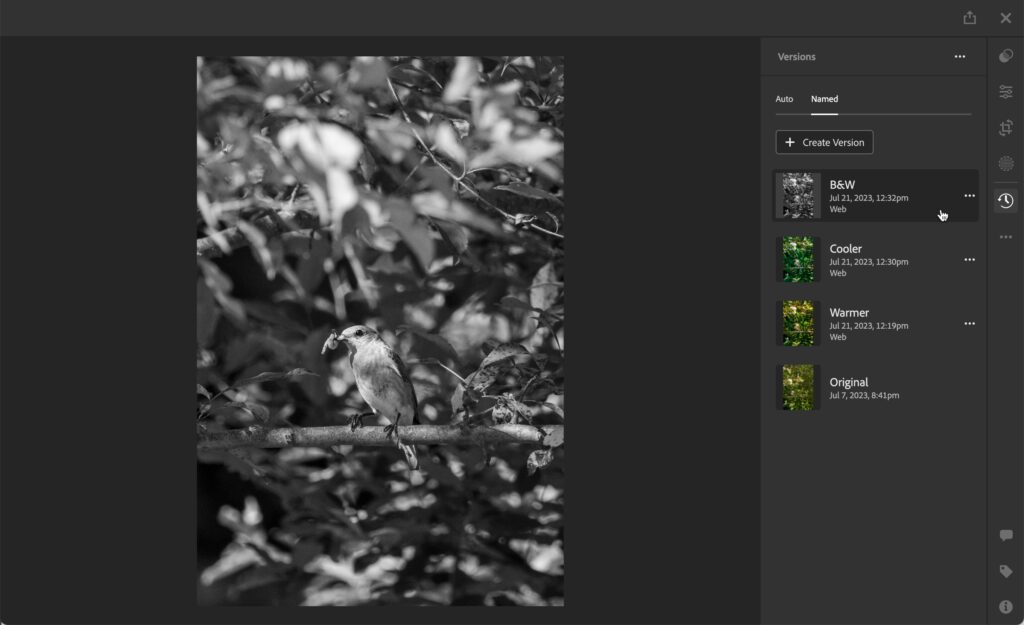
If you’re wanting to experiment with different looks and styles you can even take advantage of the Versions feature here on the web. Versions are like snapshots in Lightroom Classic in that they are only visible when you are in the Versions screen, where you can add, delete, and rename versions as desired. To create a new look while saving the original, go into the Named tab and click Create Version, where you’ll be prompted to give it a meaningful name and click Create. This saves the current look as a version. Now you’re ready to experiment. Click the Edit icon and make your changes for the new look. Go back into Versions, click Create Version, and give this new look a name. The thumbnail of the photo will reflect the currently selected version. To switch to a different version, you’ll need to select that photo, go back into Versions, and then select the thumbnail representing the desired look you want to see.
There’s a lot of cool features hidden away in Lightroom web, and the best part of it is that allows you to access your cloud-based library (which includes smart previews synced from Lightroom Classic) from anywhere you have Internet and a web browser. Give it a try and spend a few minutes exploring the Learn and Discover sections to further improve your experience with Lightroom.
The post Getting to Know Lightroom Web appeared first on Lightroom Killer Tips.
Continue reading...
To get there, just point your browser of choice to lightroom.adobe.com and sign in with the same Adobe ID and password you use for your Creative Cloud subscription. If you’ve already synced photos from Lightroom Classic or imported directly into one of the Lightroom apps, you’ll see those photos are already here. From the Home screen you can easily access recently added and edited photos, add new photos through your browser (full resolution photos that will be uploaded to the cloud, synced across Lightroom apps, and count against storage), access folders and albums, explore the Learn and Discover features, and quite a bit more. Along the top of the interface are icons for viewing notifications, checking cloud storage quota, downloading the desktop and mobile apps, accessing help and support, and accessing your account info and Technology Previews.
Technology Previews are a sneak peek into new features that aren’t fully formed but are functional enough for customers to test drive and give feedback to the Lightroom team. At the time of writing this there are two available, Collaborative Proofing and Clean Up. Collaborative Proofing has been around for a few years now as a tech preview. Clean Up is relatively new, and once enabled you’ll find a Clean Up menu item under the All Photos grouping on the left panel. Adobe doesn’t provide any glimpse into what’s under Clean Up’s hood, and simply states that it identifies photos you may want to remove to save space. Looking at the photos it suggested for me I can see it doesn’t like photos that are blurry or poorly exposed, such as these shots from my trail camera.
You can go through the photos it gathers arranged in added date and select photos that can either be flagged as rejected or just outright deleted. You can use CMD+A (PC: Ctrl+A) to select all and mark them all at once, but I wouldn’t recommend that without going through them all first, as it doesn’t like intentional blurring such as panning or slow shutter shots and really hates screen captures. Housekeeping is important, and tools like this can be helpful, but you still want to be in the driver’s seat. If you use it, be sure to click the Feedback button and let Adobe know what you think.
Grouped along with Clean Up you’ll find access to your Deleted photos (you’ve got 60 days to restore before they are automatically removed for good), Sync Issues (which groups photos having any sync related issues, which can help you identify where a problem may exist, such as in my case I had shut down Lightroom on my laptop before syncing had completed), Gallery (learn how to set up a Gallery), and Connections (these are also found in the Mac/Win version of Lightroom and allow you to send photos to online print services).
When working with your photos, you can add and remove them from albums, create new albums and folders, add and remove photos from storage, share them with others, and most amazingly edit them with much of the same functionality we have in the other Lightroom apps. To see your options, select an album, then select a few photos within it to activate the blue bar above the thumbnails. Here you’ll find the options for setting the cover photo, removing photos from the album, deleting them from the cloud, adding to another album, moving to another album, adding them to a connection, sharing them with others, downloading them, or applying keywords. In this case, I’m going to click Remove to remove these duplicates from the album.
Clicking on a single photo will switch to showing that one photo in a loupe view, where you can apply flags, ratings, keywords, title, and caption (click the i icon to access title and caption fields as well as see more information about the photo). From this view you can also access the suite of editing tools along the right panel and download and share icons along the top. Clicking the X button returns you to the Grid view. The editing tools available here are limited compared to the full apps, but still plenty powerful for something you access in a web browser.
The icon at the top will take you into all the presets that ship with Lightroom, your own custom presets, as well as presets recommended by Lightroom’s AI from the larger community. These can be a great way to explore looks and start from a different place.
Whether you apply a preset or not, the next icon down will take you into the editing suite where you can customize things to your taste. You’ll find the Light, Color, Detail, Effects, Optics, and Geometry panels waiting for you to adjust and get real-time updates as you go. These edits are then synced across all other Lightroom apps. If cropping is desired, click the Crop tool icon and fine tune your composition. When finished, click the X at the top to keep your edits and return to Grid view.
The Masking tools have been updated here as well, though not as full featured as you may be used to in other Lightroom apps. With a photo in Loupe view, click the Masking icon to edit existing masks or create new ones. The mask types are currently limited to Subject, Sky, Background, Radial Gradient, and Linear Gradient, though Adobe says more options will be coming in the future. When adjusting a mask’s settings, we’re limited to Light, Color, Effects, and Detail.
If you’re wanting to experiment with different looks and styles you can even take advantage of the Versions feature here on the web. Versions are like snapshots in Lightroom Classic in that they are only visible when you are in the Versions screen, where you can add, delete, and rename versions as desired. To create a new look while saving the original, go into the Named tab and click Create Version, where you’ll be prompted to give it a meaningful name and click Create. This saves the current look as a version. Now you’re ready to experiment. Click the Edit icon and make your changes for the new look. Go back into Versions, click Create Version, and give this new look a name. The thumbnail of the photo will reflect the currently selected version. To switch to a different version, you’ll need to select that photo, go back into Versions, and then select the thumbnail representing the desired look you want to see.
There’s a lot of cool features hidden away in Lightroom web, and the best part of it is that allows you to access your cloud-based library (which includes smart previews synced from Lightroom Classic) from anywhere you have Internet and a web browser. Give it a try and spend a few minutes exploring the Learn and Discover sections to further improve your experience with Lightroom.
The post Getting to Know Lightroom Web appeared first on Lightroom Killer Tips.
Continue reading...